Offering a lead magnet to your visitors is probably one of the most effective ways to grow your email list and capture high-quality leads.
However, estimates suggest that around 10-20% of lead magnets may not be accessed by users, due to factors like email address typos, spam filters, or users simply forgetting to download them after opting in.
Over the years, I’ve learned that having a dedicated landing page with the right tools can make all the difference in grabbing attention, driving conversions, and preventing accessibility issues.
In this guide, I’ll share the steps I use to create lead magnet pages and a signup form that allows you to capture email addresses effectively.
How To Create a Lead Magnet Landing Page
You’ll be pleased to hear that it’s quite easy to create a lead magnet page in WordPress. Follow the steps below to get started:
1. Create the Lead Magnet for Your Audience
The first step is putting together your lead magnet. There are so many options to choose from, depending on what your audience will find valuable.
If you’re not sure where to start, think about what your audience would find helpful enough to exchange their email address for.
For this guide, I’ll use a free eBook as an example. To kick things off, simply heading to your WordPress dashboard.
From there, go to the Media section and click on Add New Media File. Then, click the Select Files button to upload your file.
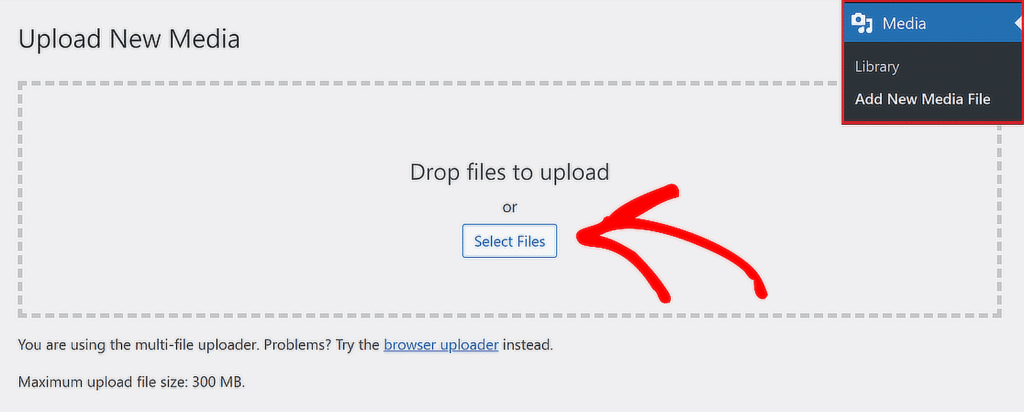
Once the upload is complete, you’ll see an option at the bottom right corner of the screen to Copy URL to clipboard.

Copying this link will save the URL for your uploaded file. I recommend pasting it somewhere safe, like a notes app or Word document, since you’ll need it later.
2. Add Your Lead Magnet to a WordPress Post
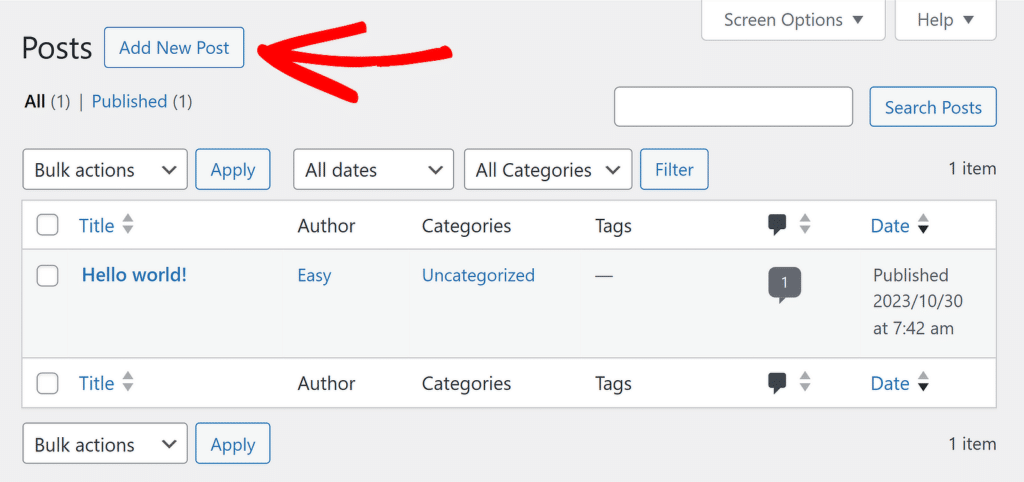
To start, go to your WordPress dashboard and click on All Posts. Then, select the Add New Post button at the top-left corner of the screen.
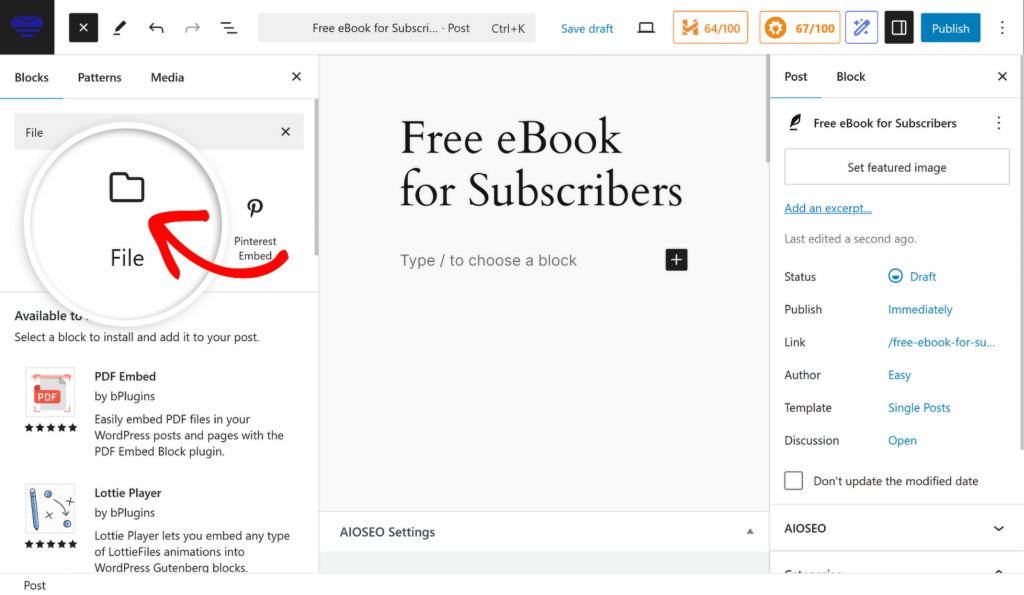
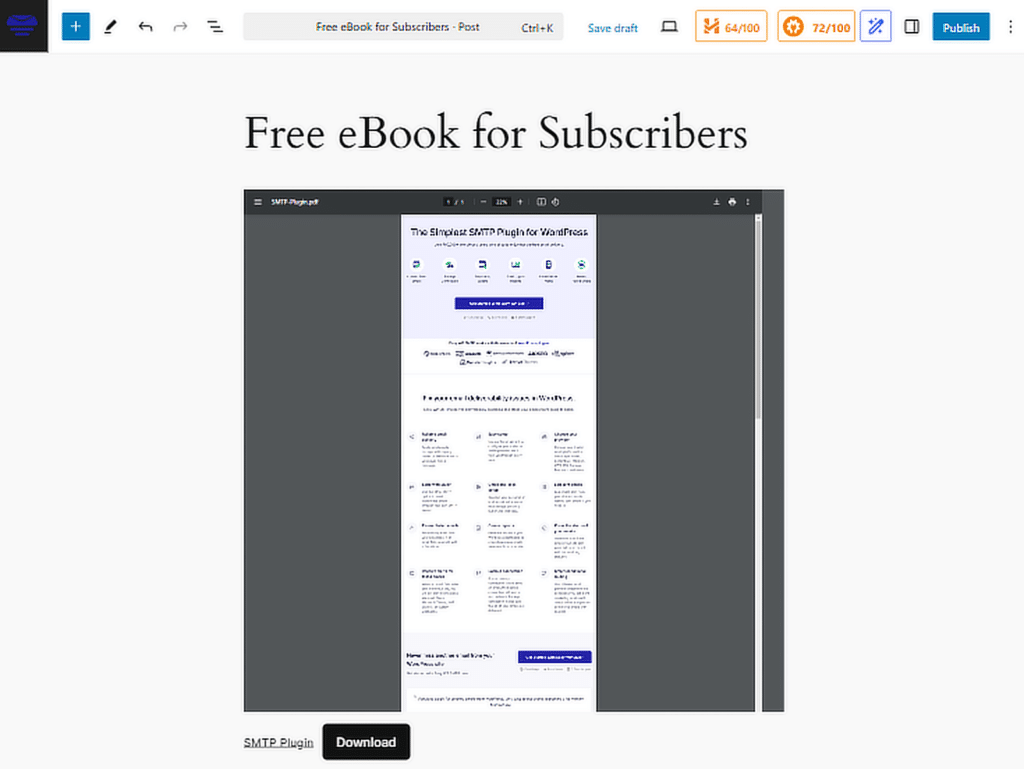
Once the new post editor opens, give your post a title that fits your lead magnet. Next, you’ll need to use the File block to attach your lead magnet to the post.
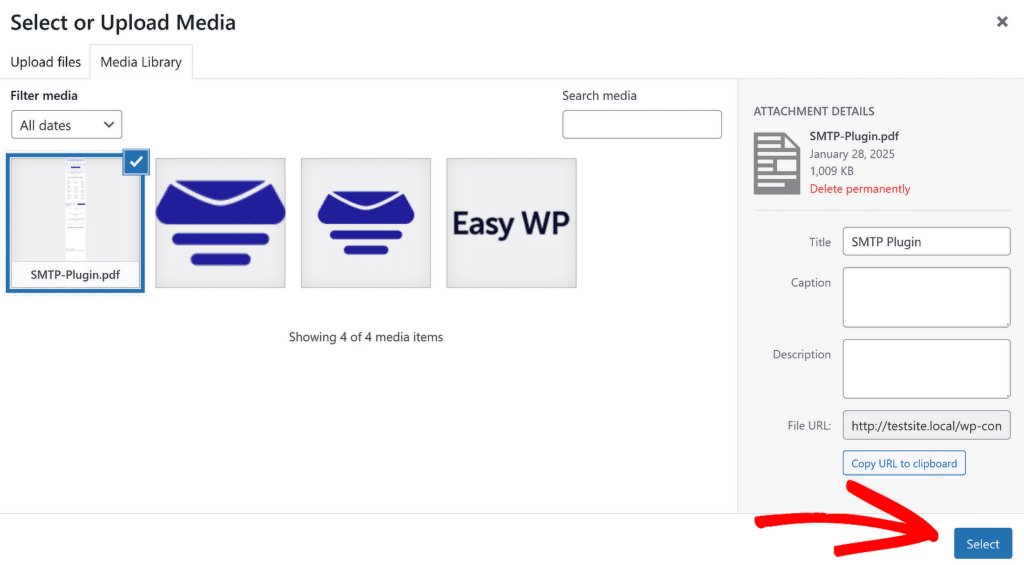
After adding the File block, click on the Media Library button. Find the file you previously uploaded, select it, and hit the Insert button to attach it to the post.
If you’re offering something like a free eBook (as we’re doing in this example), you’ll see a preview of the PDF along with a Download button just below it.
Since the goal here is to exchange your lead magnet for an email address, it’s crucial to ensure that search engines can’t index this file.
This step, called “no indexing,” ensures your content remains exclusive, and I’ll walk you through how to set it up next.
3. Hide Your Lead Magnet from Search Engines
To make sure search engines like Google don’t index your lead magnet page, you can use a handy WordPress plugin called All in One SEO (AIOSEO).
If you haven’t installed AIOSEO yet, check out this simple guide on adding plugins to WordPress.

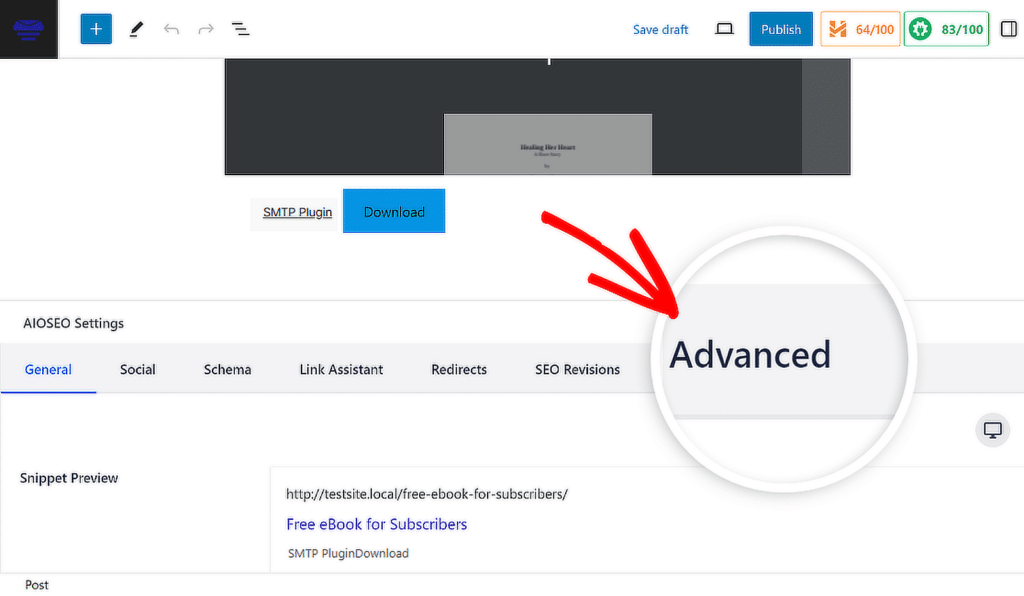
Once installed, return to the post where your lead magnet file is attached. Scroll down a bit, and you’ll see a new section labeled AIOSEO Settings. From there, click on the Advanced tab.
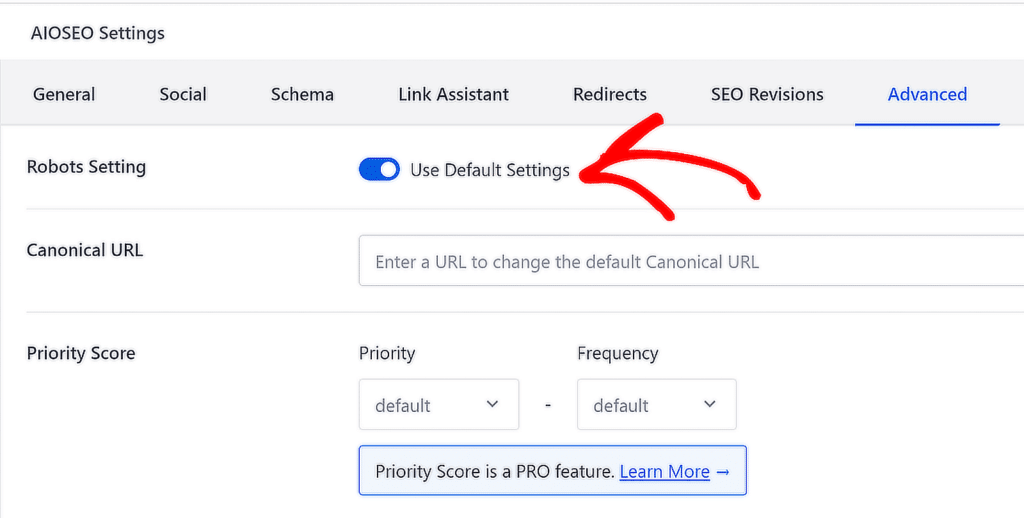
In the Advanced tab, you’ll find a section called Robots Settings with a toggle labeled Use Default Settings. Turn this toggle OFF.
Once you do this, additional options will appear under Robots meta. To keep the page out of Google’s search results, simply check the No Index box.
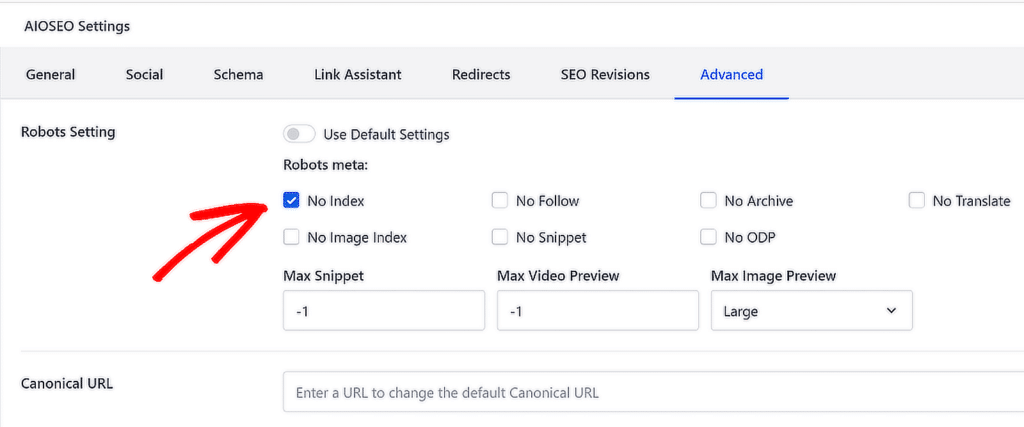
What happens next is that AIOSEO automatically adds a line of code to block this page from being indexed. Don’t forget to save or Publish the page when you’re done.
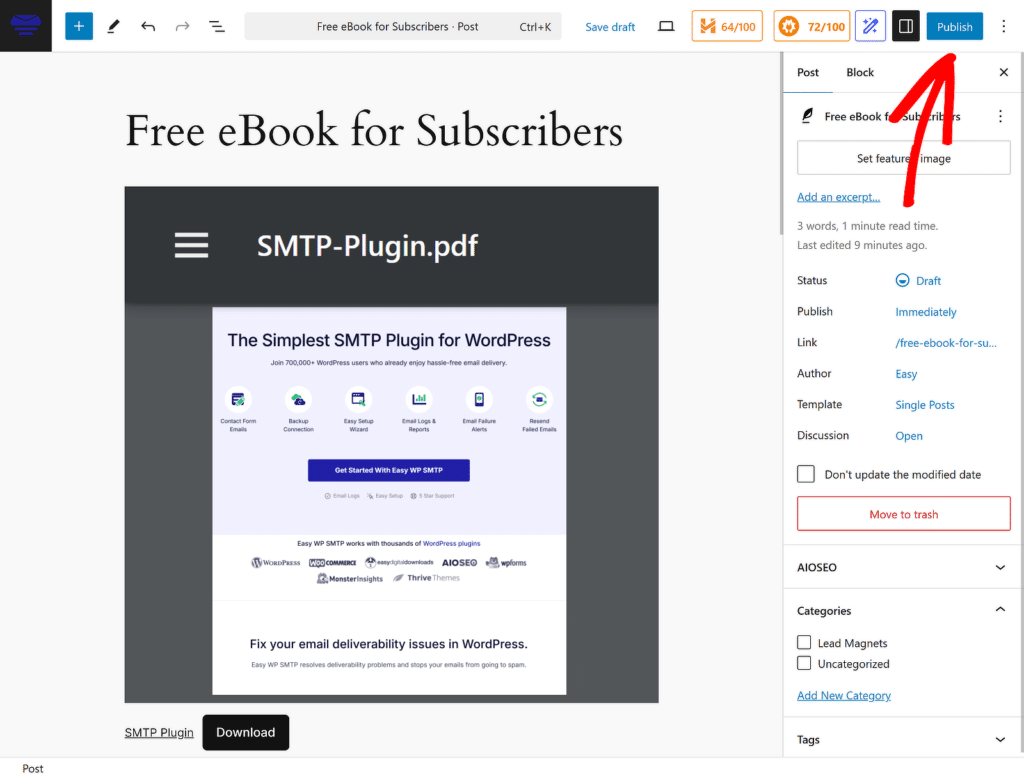
That’s it! Your lead magnet page is now private and safe from search engines. Next, we’ll create an opt-in form to guide users to this page.
4. Create Your Opt-In Form with WPForms
Setting up an opt-in form using WPForms is incredibly straightforward. If you don’t already have WPForms installed, follow this guide to install and activate the plugin.
Once the plugin is ready to go, head to your WordPress dashboard and navigate to WPForms » Add New.
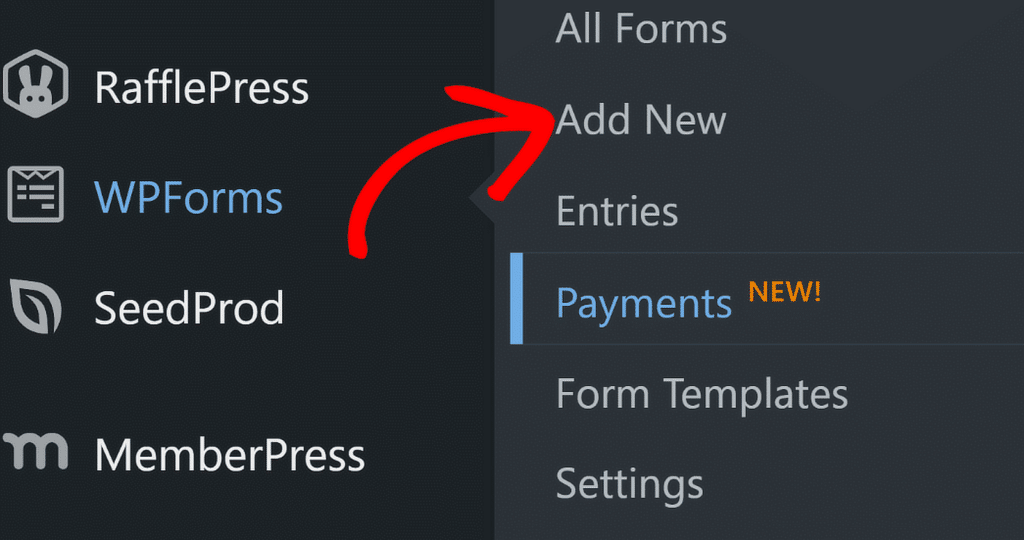
This will take you to the form creation page. Begin by giving your form a name and selecting a template.
For this example, I’ll go with the basic Newsletter Signup Form, which makes the process faster and easier.
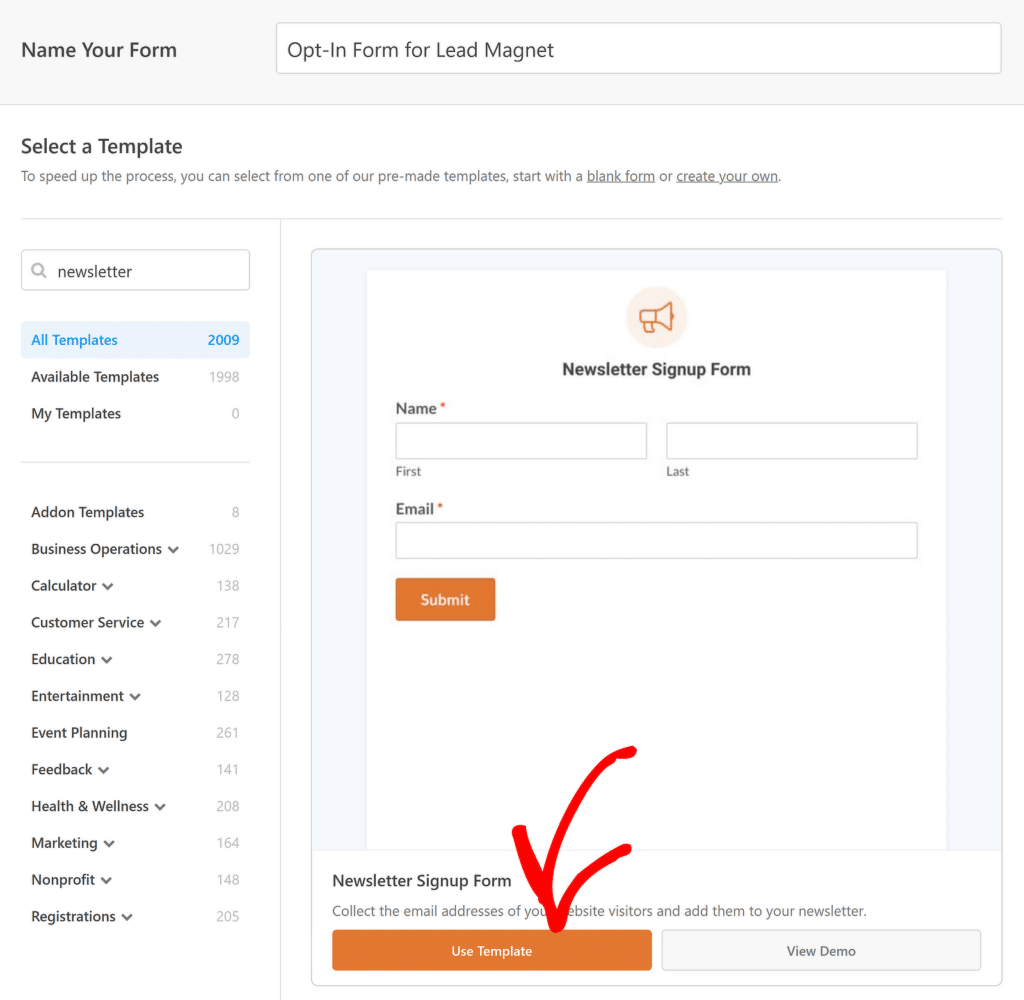
When the template loads, most of the essential fields are already set up for you. The default fields include Name and Email, which is perfect for a lead magnet form.
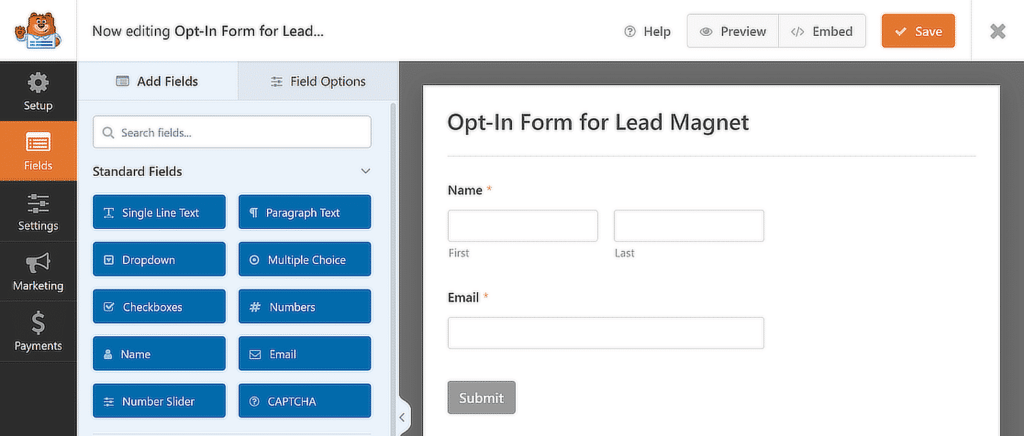
Using the drag-and-drop builder in WPForms, you can customize the form as much as you want. You can move fields around, add new ones, or remove what you don’t need.
For a lead magnet, though, it’s best to keep the form short and simple to avoid users abandoning it halfway through.
5. Provide Instant Access to Your Lead Magnet
Once someone fills out your form, they’ll want immediate access to your lead magnet or digital product. With WPForms, there are several ways to make this happen quickly and smoothly.
Show the Lead Magnet in the Confirmation Message
One way to deliver your lead magnet is by including the link in the confirmation message that appears after someone submits the form.
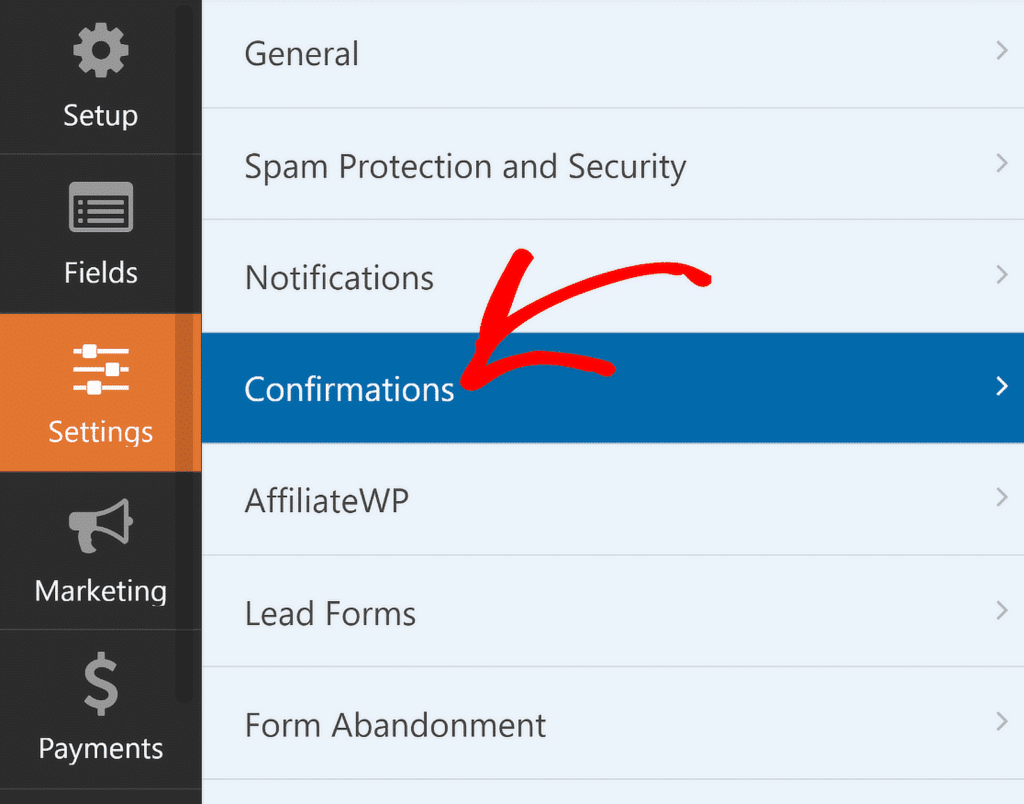
To set this up, go to the Settings section in WPForms and click on Confirmations from the menu on the left.
You can then customize the confirmation message and add the lead magnet link. Just paste the URL you copied earlier for your lead magnet file into the message.
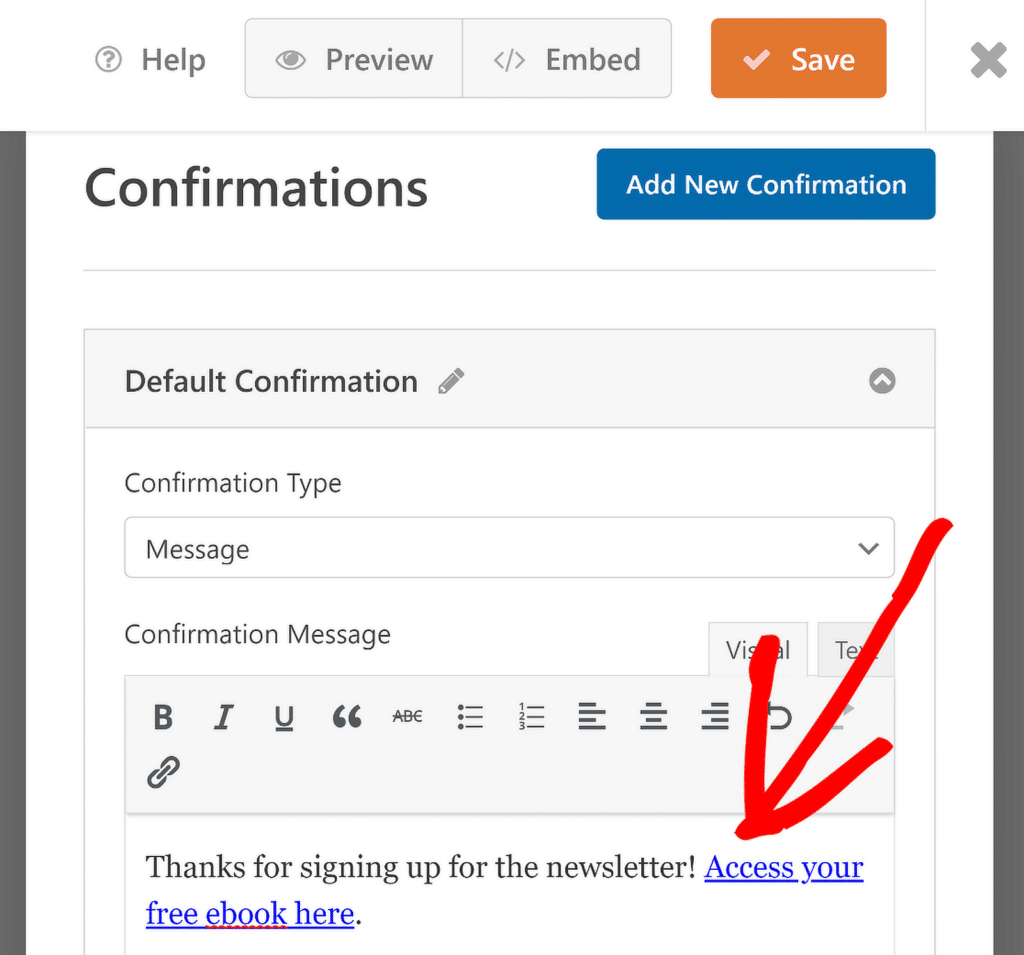
When users submit the form, they’ll see this message right away, making it simple for them to click and download your resource.
Redirect Users to the Lead Magnet Page
Another method is to automatically redirect users to a page where they can access the lead magnet after submitting the form.
In the Confirmation Type settings, select Go to URL (Redirect) and paste the lead magnet page URL into the provided field.
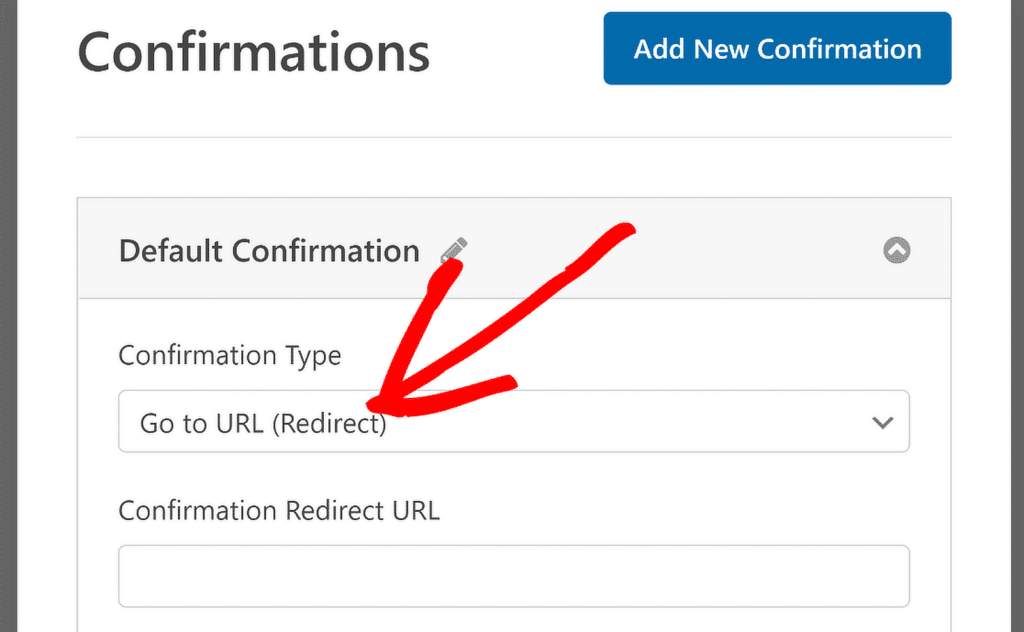
This setup ensures that users are taken directly to the resource page as soon as they hit the submit button.
Send the Lead Magnet Link by Email
You can also email the lead magnet link to users, which is a great option for building trust. Start by going to Settings and selecting Notifications.
Click on Add New Notification in the upper-right corner, and use the Email Smart Tag in the Send to Email Address field.
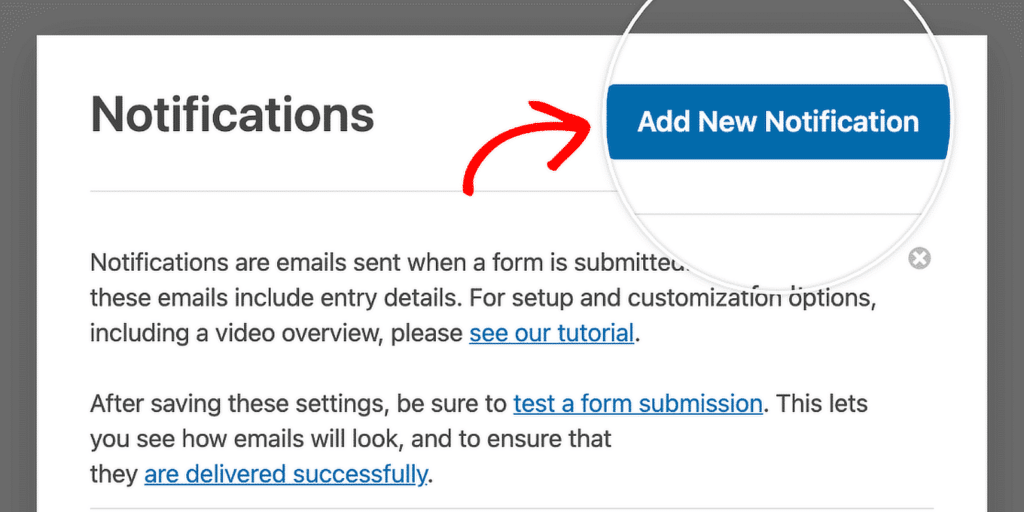
This automatically pulls the user’s email from the form. Next, paste the lead magnet URL into the Email Message section.
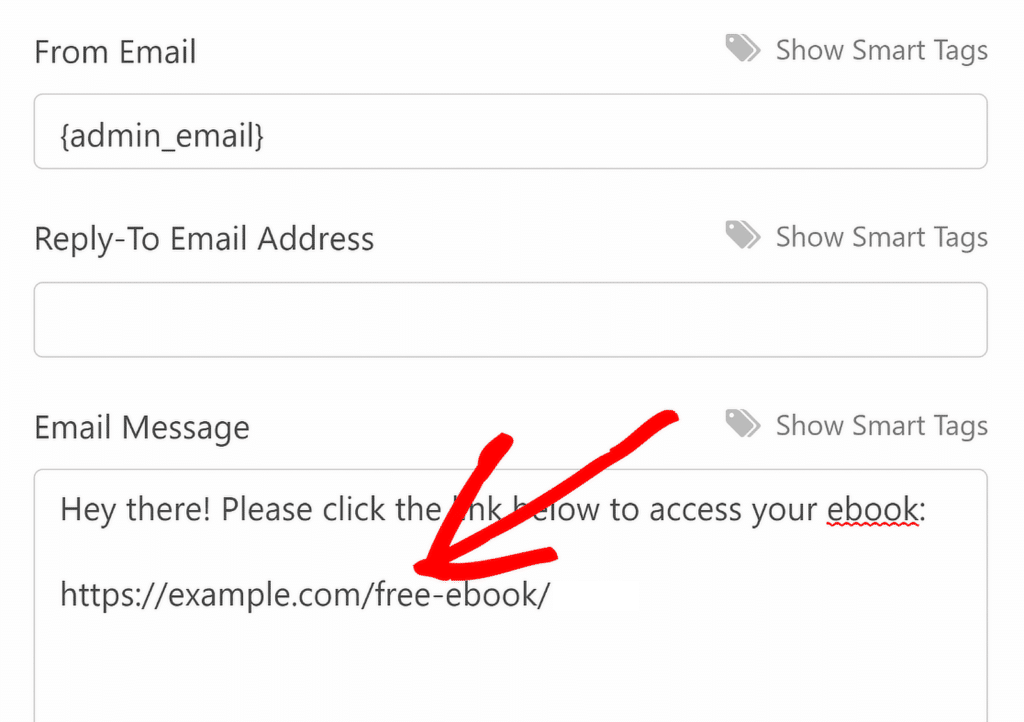
Once you’ve finished, click the orange Save button in the top-right corner. After that, one critical factor often overlooked is ensuring the emails actually reach the recipient.
That’s where Easy WP SMTP comes in. It uses proper SMTP servers to send emails securely and quickly. And honestly, it’s much better than relying on WordPress’s default email function.
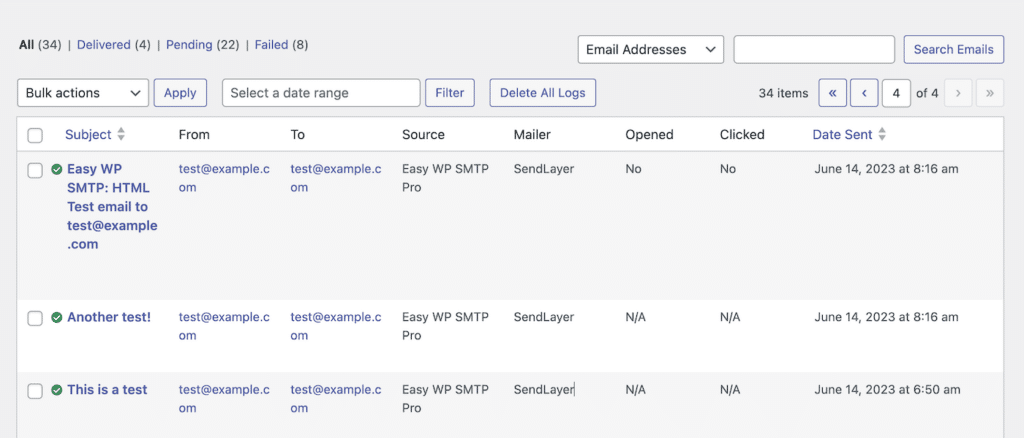
One feature I love about Easy WP SMTP is the tracking capability. You can see if your emails were delivered, opened, and even clicked. This insight is incredibly helpful for tracking your emails.
For instance, if someone claims they didn’t receive the lead magnet, you can quickly check whether the email was delivered or if there was an issue.
Publish Your Lead Magnet Form
Once everything is set, you can publish the form on your website and start capturing leads. Click on the Embed button at the top of the form builder.

You’ll have two options for embedding the form. For this guide, I’ll be choosing the Create New Page.
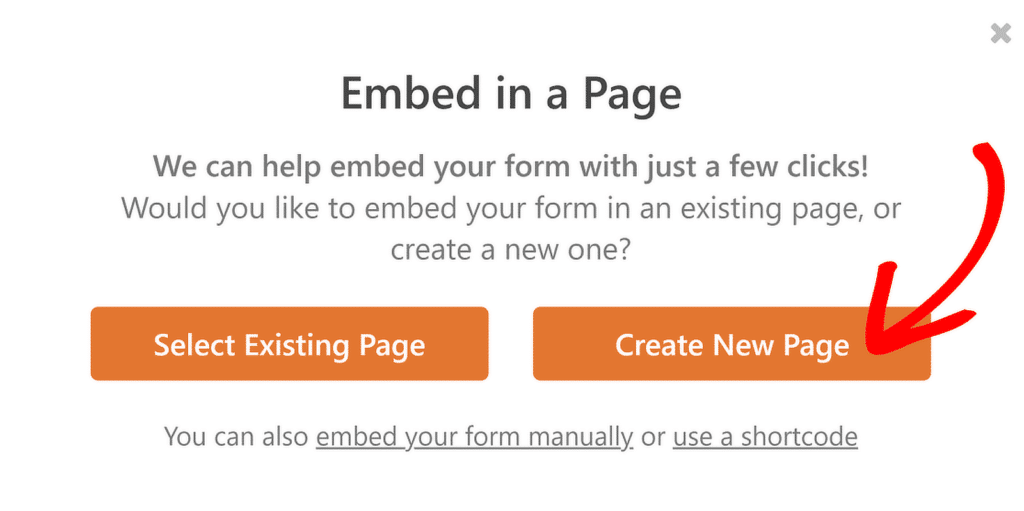
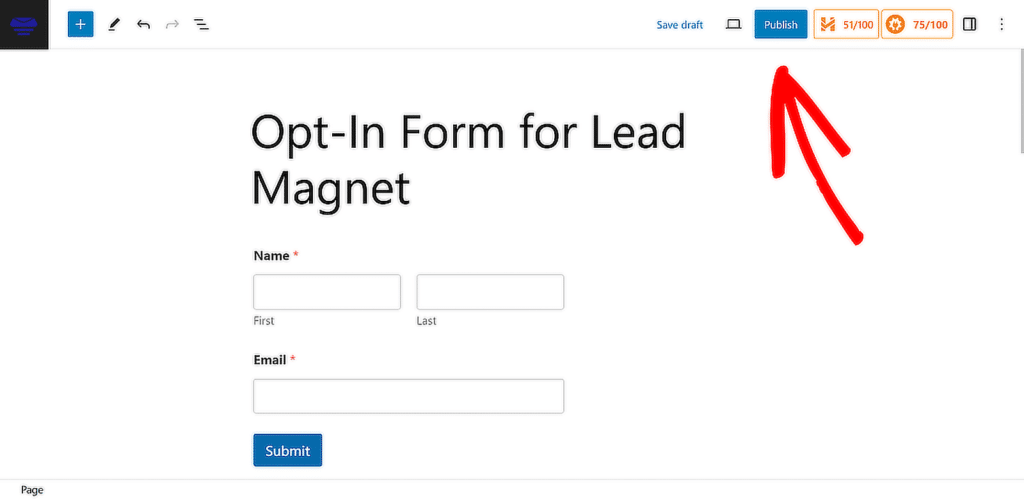
Give your new page a name and click Let’s Go. This will take you to the WordPress block editor, where you can hit the Publish button to make the page live.
Finally, test the form by entering a sample submission to ensure the confirmation message, redirection, or email notification works as expected.
FAQs on How to Create a Lead Magnet Landing Page in WordPress
Creating a lead magnet landing page in WordPress is a popular topic of interest among our readers. Here are answers to some common queries about it:
What types of lead magnets work best for increasing sign-ups?
Lead magnets that solve specific problems for your audience tend to work best. Examples include free eBooks, checklists, cheat sheets, templates, case studies, or exclusive guides.
Interactive options like quizzes or calculators can also be very effective as they engage users while providing value.
How do I protect my lead magnet page from being indexed by Google?
You can prevent search engines from indexing your lead magnet page by using a plugin like AIOSEO, which also comes in handy for website maintenance tasks.
Once installed, go to the page settings, find the Robots Setting option, and enable the No Index feature. This stops search engines from including the page in search results.
How do I connect WPForms to deliver my lead magnet automatically?
WPForms allows you to send your lead magnet link via email or display it in a confirmation message after someone submits the form.
Simply customize your form settings to include the lead magnet URL in the email notification or confirmation message, making it easy for users to access.
Can I redirect users to a thank-you page after submitting the form?
Yes, WPForms makes it simple to redirect users to a custom thank-you page. In the confirmation settings of your form, select the Go to URL (Redirect) option, and add the URL of your thank you page. This gives users a clear next step after submitting their information.
How do I test the performance of my lead magnet landing page?
To test your lead magnet page, track metrics like conversion rates, bounce rates, and time spent on the page using tools like Google Analytics or MonsterInsights.
You can also run A/B tests to compare different designs or call-to-action placements to see what resonates best with your audience.
That’s it! Now you know how to create a lead magnet page in WordPress
Next, check out this guide to learn about the top email design trends and best practices, so you can create emails that not only look great but also deliver real results.
