In this tutorial, we’ll show you how to improve email deliverability with the SendGrid mailer in Easy WP SMTP.
1. Setting Up a SendGrid Account
To get started, you’ll need to sign up for a free SendGrid account if you don’t have one already.
If you already have a SendGrid account, simply log in to SendGrid with your existing account details.
2. Creating Your Sender Identity
To start sending emails with SendGrid, you’ll first need to set up a sender identity.
There are two ways you can do this: either authenticate your website’s domain or verify a single sender.
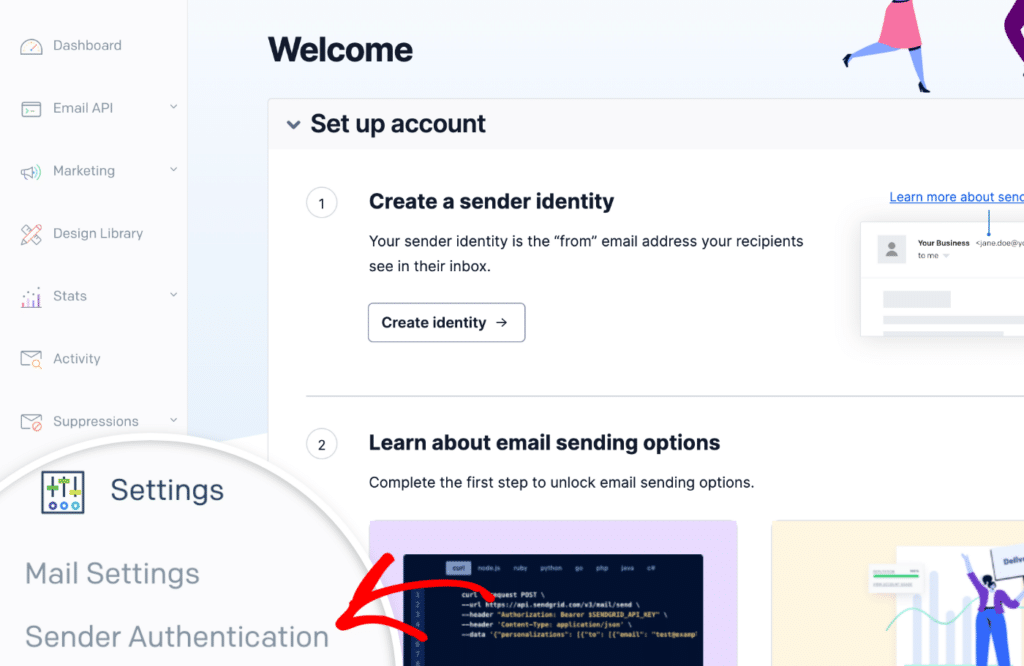
To access both of these options, go to Settings » Sender Authentication in the SendGrid dashboard menu. This will take you to the Sender Authentication page.
While we recommend going with domain authentication for more consistent email delivery, we’ve provided details for both approaches below.
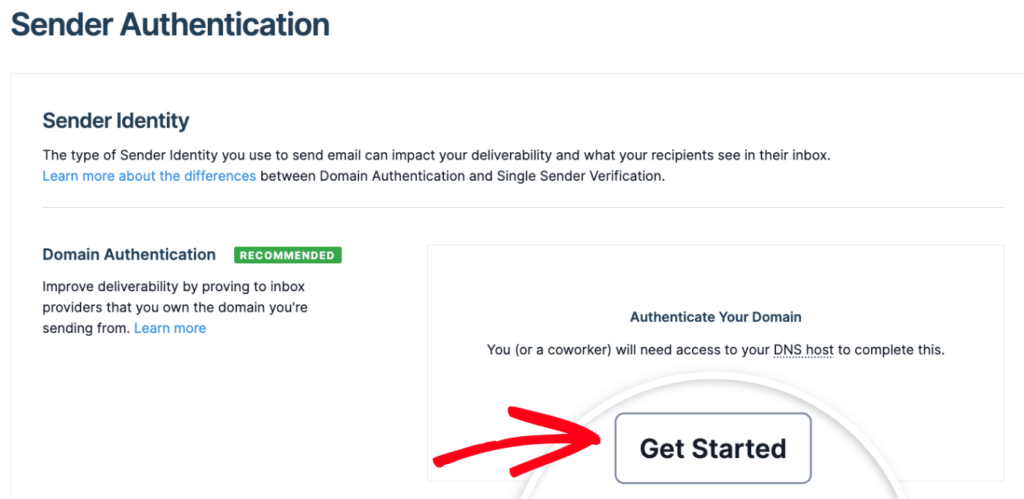
Authenticating Your Domain in SendGrid (Recommended)
Authentication validates that emails originate from a domain under your ownership. This enhances your domain’s credibility as a trustworthy email sender. Furthermore, by authenticating, you eliminate the “via sendgrid.net” notation that might otherwise appear in your emails.
Note: In order to move ahead with domain authentication in SendGrid, you’ll need access to your site’s DNS settings.
If you’re not sure where to find your DNS settings or feel unsure about making changes to them, please contact your site’s hosting provider before proceeding. Or, for more details, you can check out WPBeginner’s tutorial on DNS settings.
To get started, locate the Domain Authentication section and click the Get Started button.
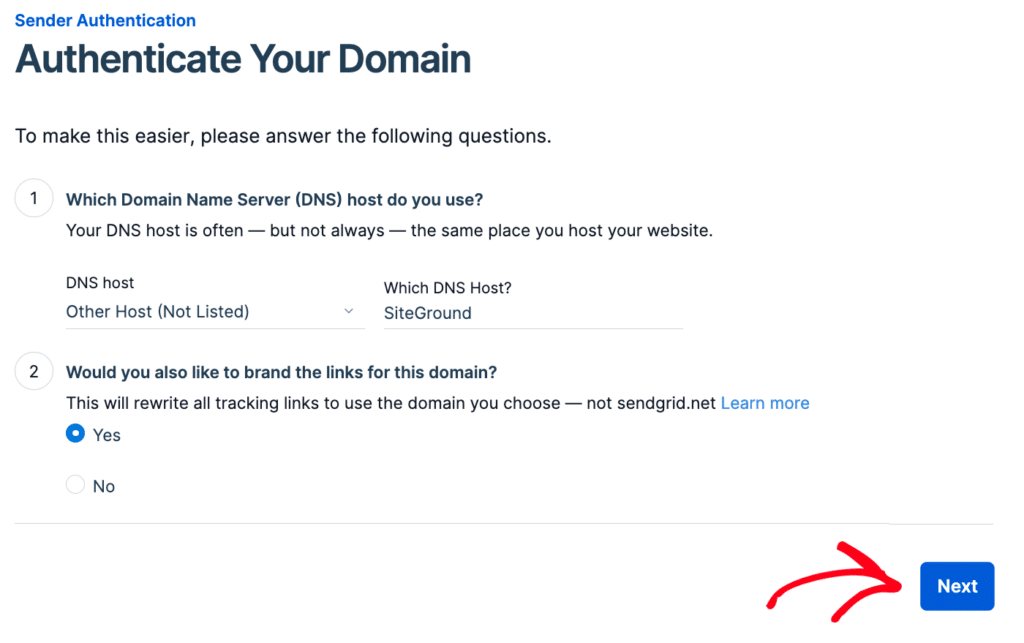
This will take you to the Authenticate Your Domain page, where you’ll need to answer the following questions:
- Which Domain Name Server (DNS) host do you use? Select your DNS provider from the available list. If you don’t see a match, choose Other Host (Not Listed) and type in your DNS host manually.
- Would you also like to brand the links for this domain? We recommend selecting Yes. This will allow any links in the emails sent from your site to use your own domain rather than SendGrid’s. Branded links help to further ensure delivery by keeping all links tied to your own site.
Once you’ve answered these questions, click the Next button to continue.
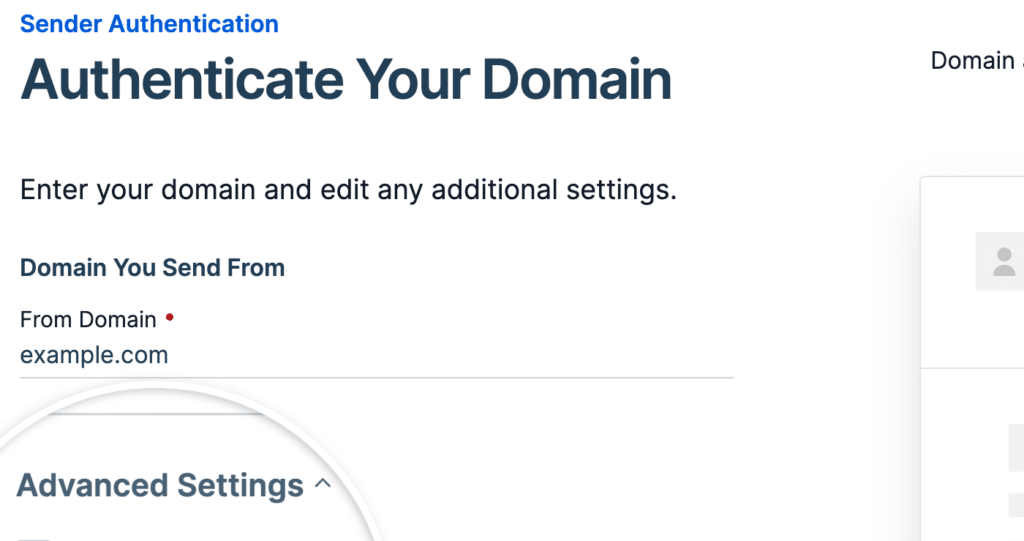
For the next step, you’ll need to enter your site’s domain (e.g., example.com) in the From Domain field. After you’ve entered your domain, click on Advanced Settings.
You’ll need to make the following adjustments here:
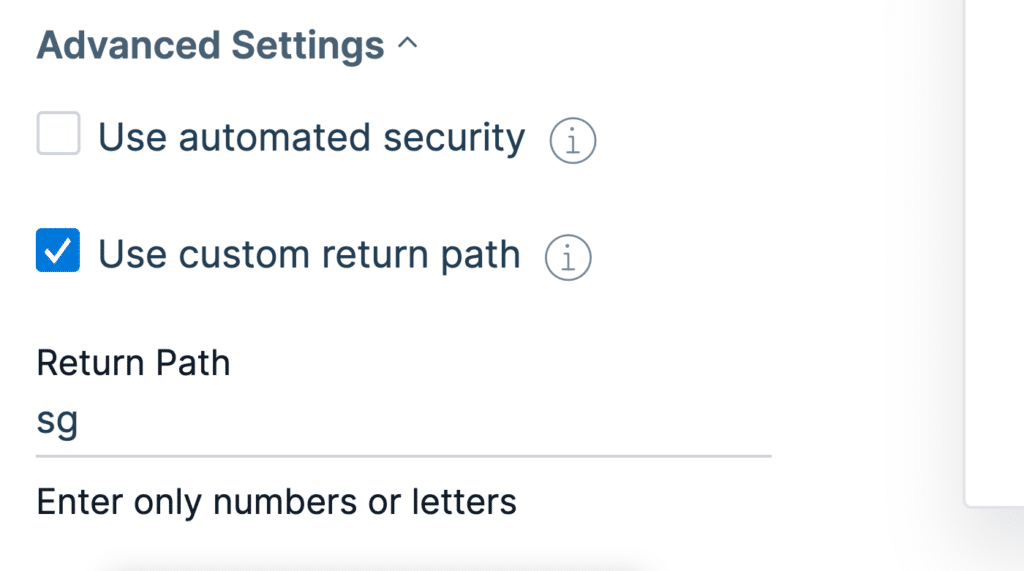
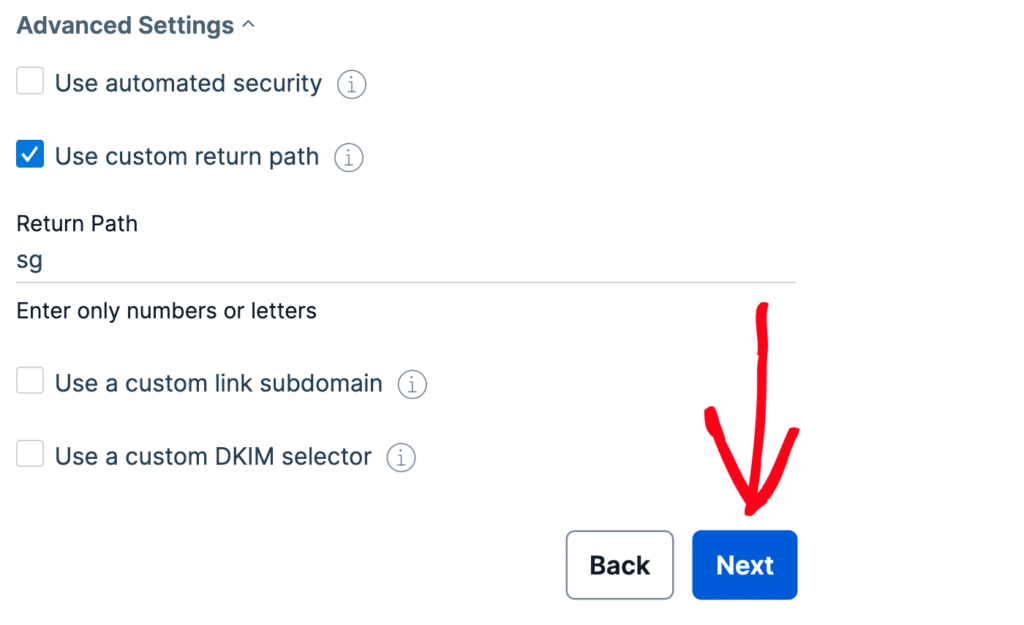
- Uncheck the box labeled Use automated security.
- Check the box labeled Use custom return path.
- Add a subdomain in the Return Path field (see below for details).
A subdomain replaces the “www” part of your website’s address (e.g., subdomain.example.com). Subdomains can be used to add separate sections or directories to your website. For example, a site’s blog might be at blog.example.com.
In this case, the subdomain will only be used by SendGrid to send emails and will not be visible on your site at all.
Unless you have a specific subdomain in mind, consider using sg. This is what we’ll use in our example.
Note: The subdomain can be anything you’d like. However, SendGrid recommends:
- Not using “mail,” as many hosting companies already use this subdomain, and it could cause conflicts.
- Not including any underscores (_) as this character may not be compatible with some DNS providers.
When you’re ready, go ahead and click Next.
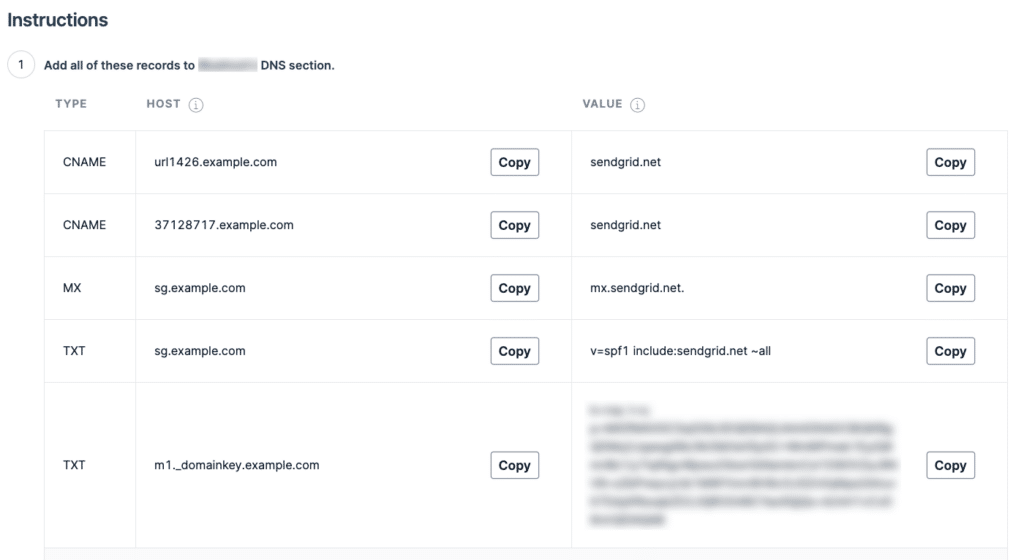
On the following page, you’ll see a list of DNS records that you’ll need to add to your site’s DNS settings.
Note: If you’re unsure where to find your site’s DNS settings or feel uncertain about making changes, please contact your site’s hosting provider before making adjustments.
Or, for more details, you can check out WPBeginner’s tutorial on DNS settings.
After you’ve opened up the DNS settings for your site, you should see an option to add a new record.
To make it possible for SendGrid to authenticate your domain, you’ll need to add these records to your site’s DNS. Be sure to copy them carefully, as you’ll need the exact values from your SendGrid account for the verification to work.
Note: If your DNS is managed by GoDaddy, then you’ll have to slightly adjust the Hostname shown in SendGrid. You’ll need to remove your normal domain when entering the Hostname into your GoDaddy DNS. For example, instead of entering “sg.example.com” for the first TXT record’s Hostname, you would only enter “sg.”
You might encounter a TTL (Time To Live) field for the record within your site’s DNS configurations. If given an option to modify it, we suggest adjusting the TTL to one day (or 86400 seconds, based on the unit employed by your DNS).
After adding all the DNS records, check the box in your SendGrid dashboard labeled I’ve added these records. Then click the Verify button. It can take up to 48 hours for DNS changes to be recognized, so you may need to check back on this later.

If the verification worked, you should see a success message.

Adding a Single Sender to Your SendGrid Account
Although we recommend authenticating your domain, you also have the option to establish an approved sender email address as an alternative by creating a single sender.
To do this, go to Settings » Sender Authentication in the SendGrid dashboard menu. Then, locate the Verify an Address section and click the Get Started button.
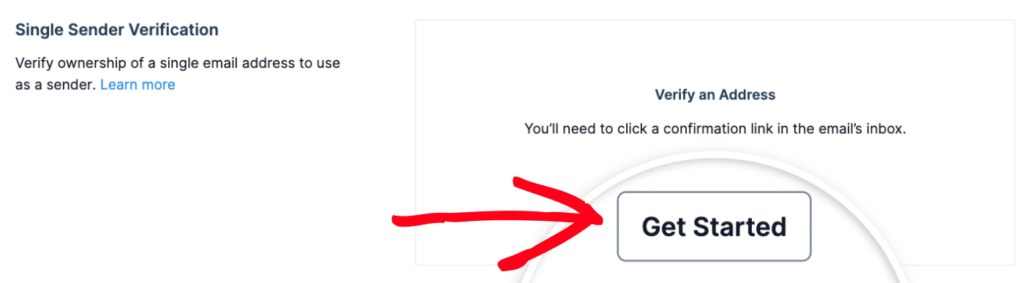
You’ll now see a panel prompting you to input the sender’s name, email, and physical mailing address. After filling in the necessary details, click the Create button.
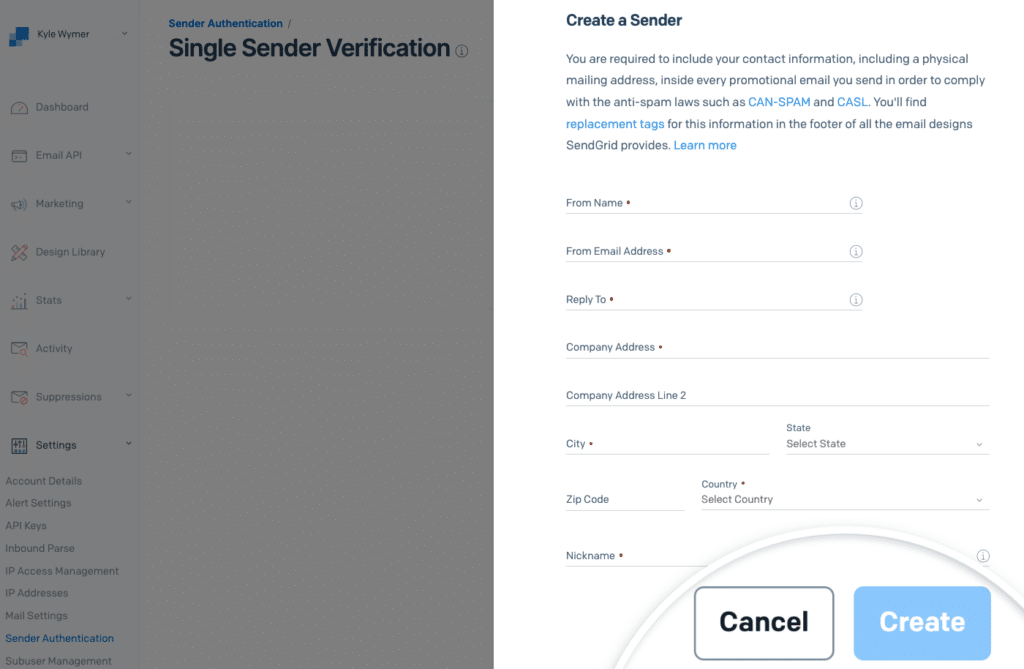
A confirmation message will be sent to the email address you entered. Click on the link in that message to verify your email and finish setting up your Single Sender identity.
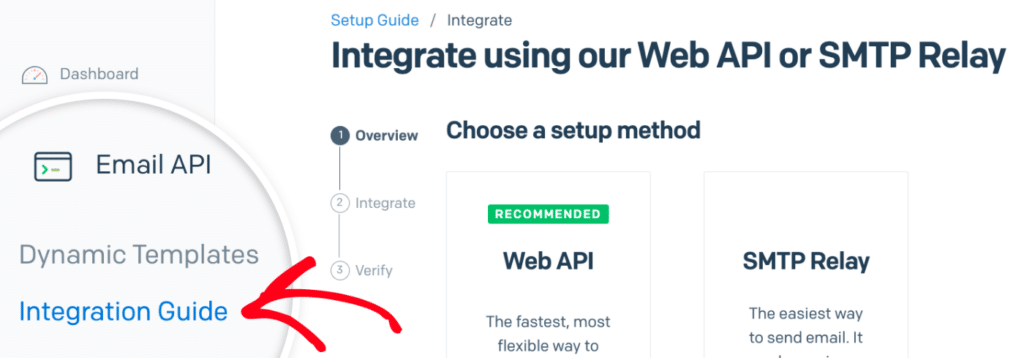
3. Generating an API Key
Once you’ve created a SendGrid account and set up your sender identity, you’ll need to generate an API key to connect your site to SendGrid and start sending emails.
To do this, go to Email API » Integration Guide in your SendGrid account dashboard.
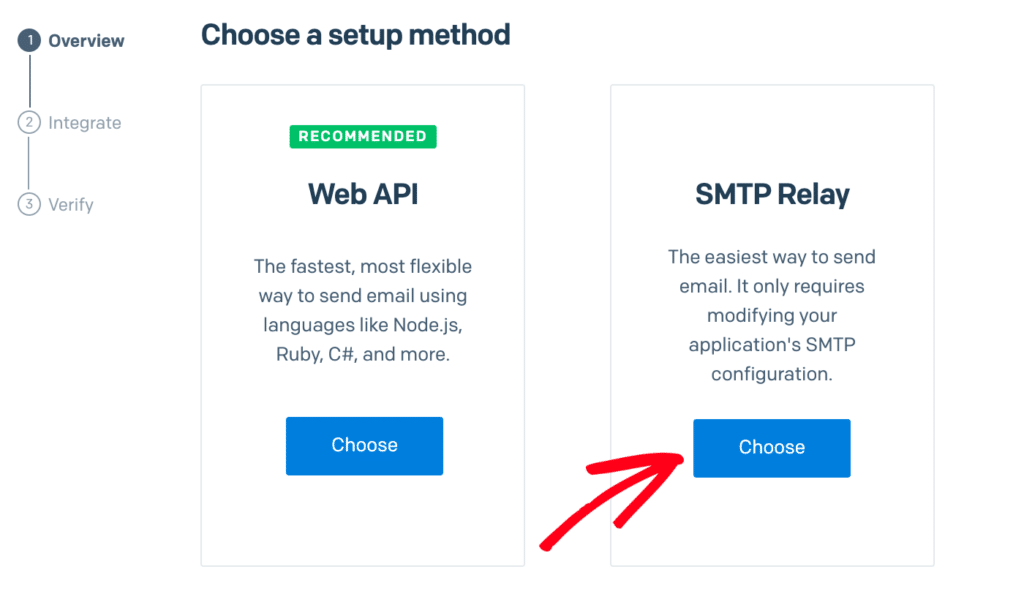
Next, you’ll be asked to choose a setup method. Go ahead and click the Choose button under the SMTP Relay option.
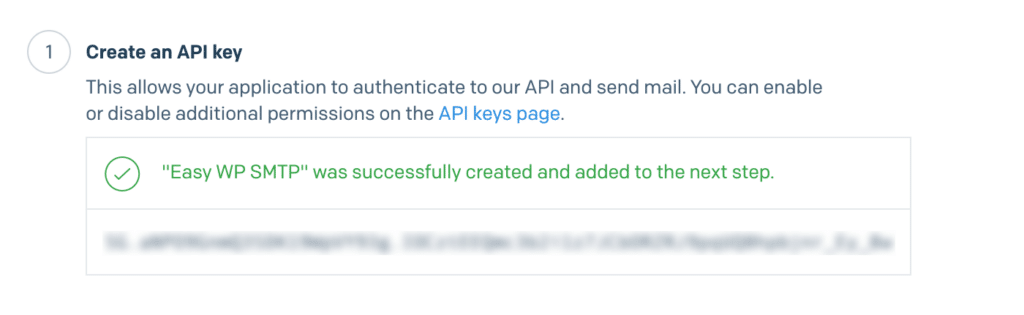
Next, you’ll need to enter an API key name and click Create Key.
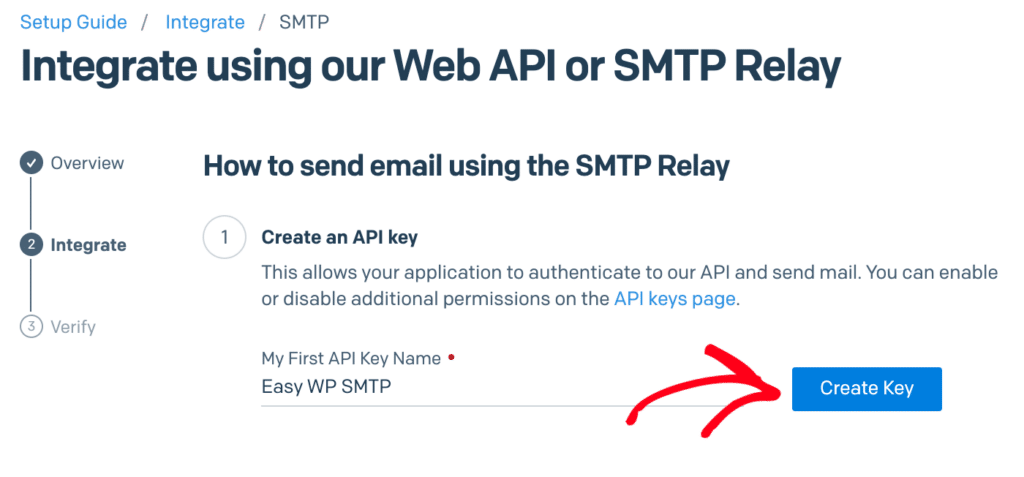
This will generate an API key for you. Be sure to leave this page open, as you’ll need this API key when you configure your Easy WP SMTP settings.
4. Configuring Easy WP SMTP Settings
Now that your SendGrid account is prepped, you can switch over to your website and set up Easy WP SMTP.
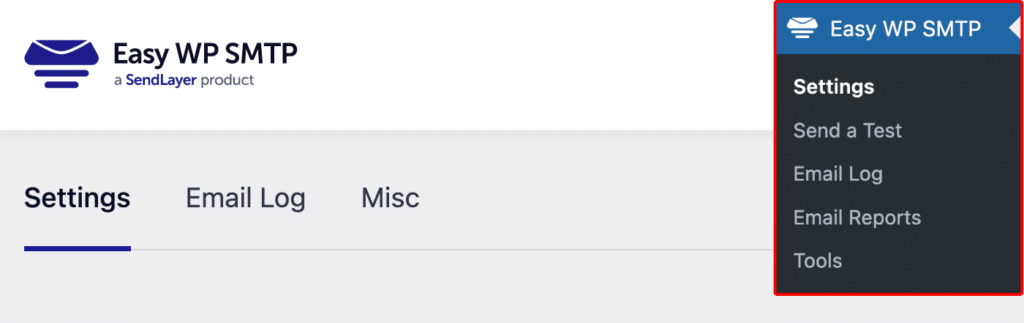
To access the settings from the WordPress dashboard, go to Easy WP SMTP » Settings.
In the next steps, we’ll go through each of the settings located on this page.
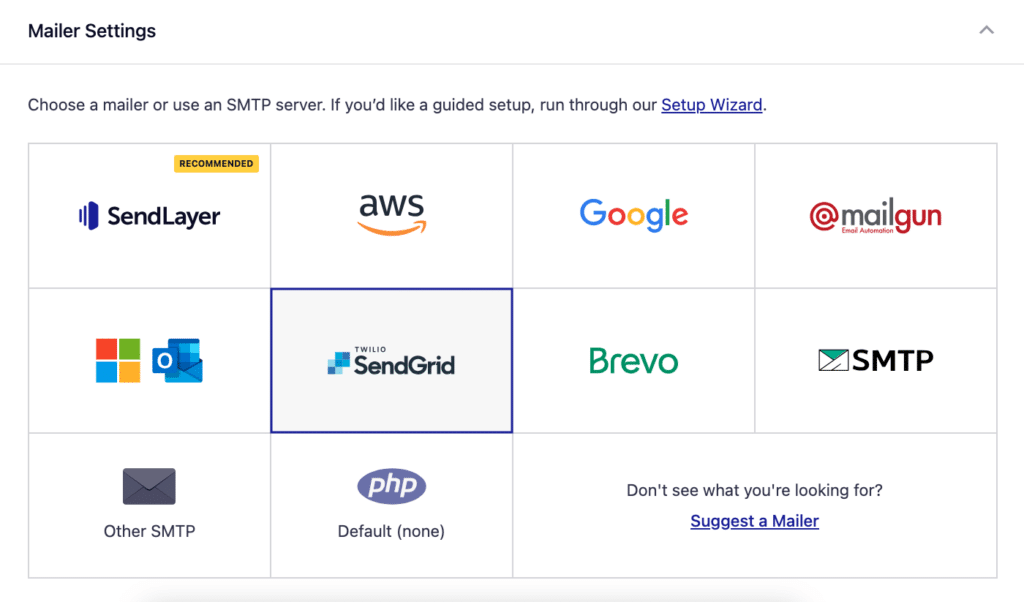
Mailer Settings
Select the SendGrid option from the list of available mailers. Once you choose SendGrid, more settings related to this mailer will appear.
API Key
Once you’ve chosen SendGrid as your mailer, you’ll need to enter your SendGrid API key.
Go ahead and flip back to the browser tab or window where your SendGrid account is open and copy the API key you generated earlier.
Then return to your Easy WP SMTP settings and paste the key into the API Key field.

Sending Domain
The Sending Domain setting is an optional setting that will allow Easy WP SMTP to check for any domain-side errors in your SendGrid setup (e.g., incorrectly configured or missing Sender Policy Framework (SPF) records). This domain check will run each time you send a test email, and will only show an error if a misconfiguration is detected.
The sending domain should match the subdomain you authenticated in SendGrid. You can copy and paste this value here.
Note: Make sure you add your entire SendGrid domain to this setting (e.g., sg.example.com).

General Settings
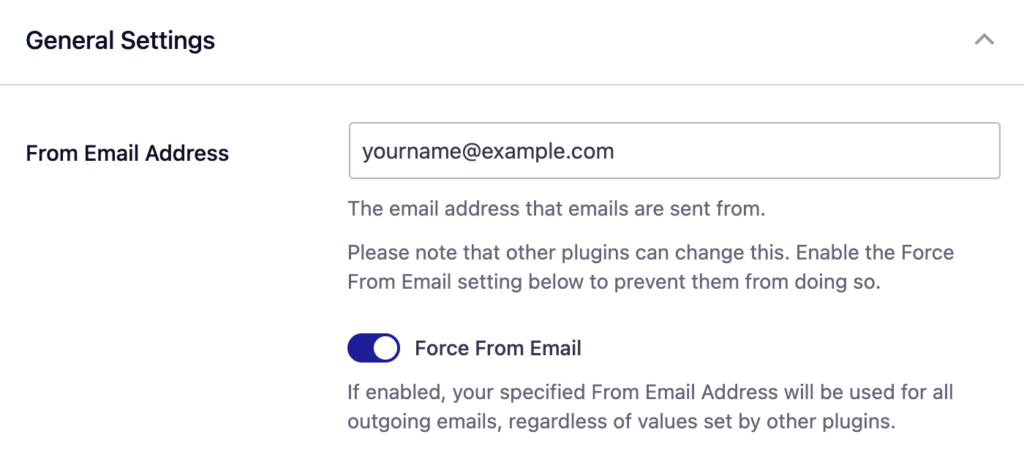
From Email
The From Email is the email address that your WordPress site’s emails are sent from. For emails to be delivered correctly, this email address must match the sending domain you authenticated in SendGrid. For example, if you authorized example.com as your domain, the From Email must contain @example.com.
We also strongly recommend turning on the Force From Email box. If enabled, your From Email will be used for all emails sent from your site, ignoring values set by other plugins.
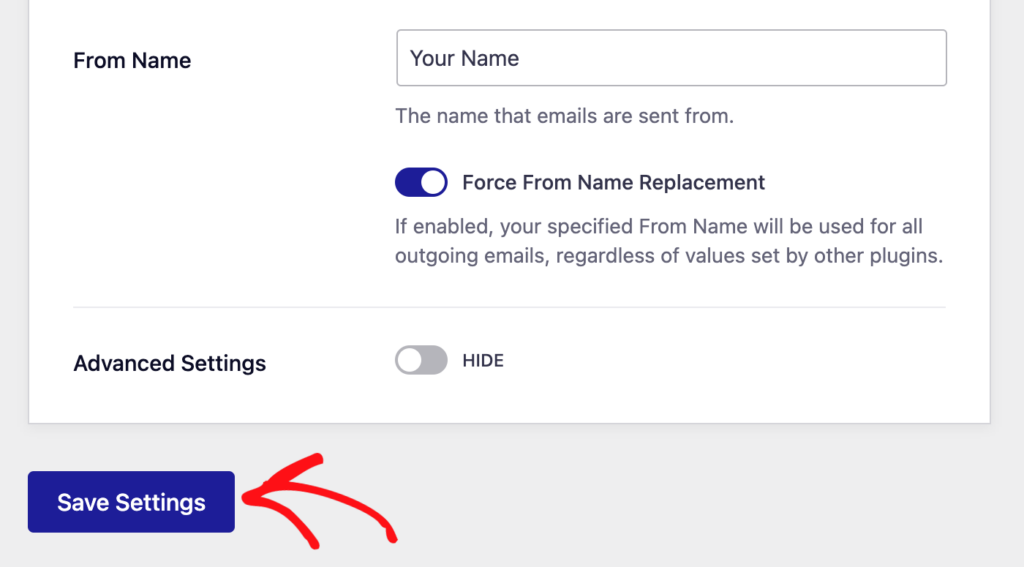
From Name
The From Name is the name that appears in the emails sent from your site, letting the recipient know who sent the email. By default, the From Name is set to your site’s name. However, you can change the name to whatever you’d like.
Similarly, you can enable the Force From Name toggle to apply the settings site-wide

When you’re done with the configuration, be sure to save your settings by clicking the Save Settings button.
5. Verifying Your SendGrid Integration
Now that you’ve got your settings configured, the next step is to verify that the integration with SendGrid is working correctly. We’ll cover this process in the following sections.
Sending a Test Email
Sending a test email through Easy WP SMTP is an essential step in making sure your connection is working as expected. You can find the built-in testing tool by going to Easy WP SMTP » Tools and clicking the Email Test tab.
For a full explanation of how to use this tool, check out our tutorial on sending test emails.
Verifying Domain Authentication
At this stage, it’s also important to check that your domain authentication worked. Each email provider will place this information in a different area of your account, but we’ll go ahead and share Gmail/G Suite as an example.
In Gmail or G Suite, click the small arrow under the sender details for your Easy WP SMTP test email.
This should open more details about the email header. From here, check that the mailed-by value matches your subdomain (e.g., sg.example.com). Then check that the signed-by value matches your regular site domain (e.g., example.com).
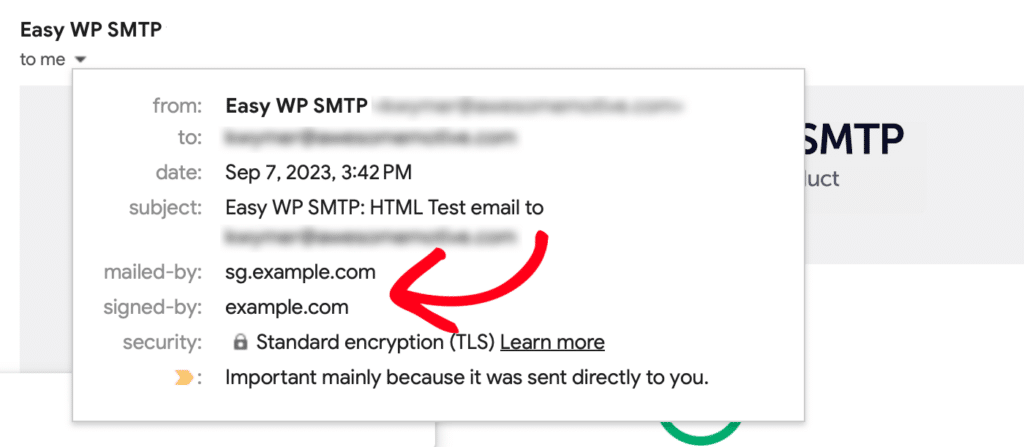
Note: If these domains don’t match your subdomain/domain yet, then SendGrid may require a little more time to fully apply your setup. We recommend waiting at least an hour and then repeat this test process.
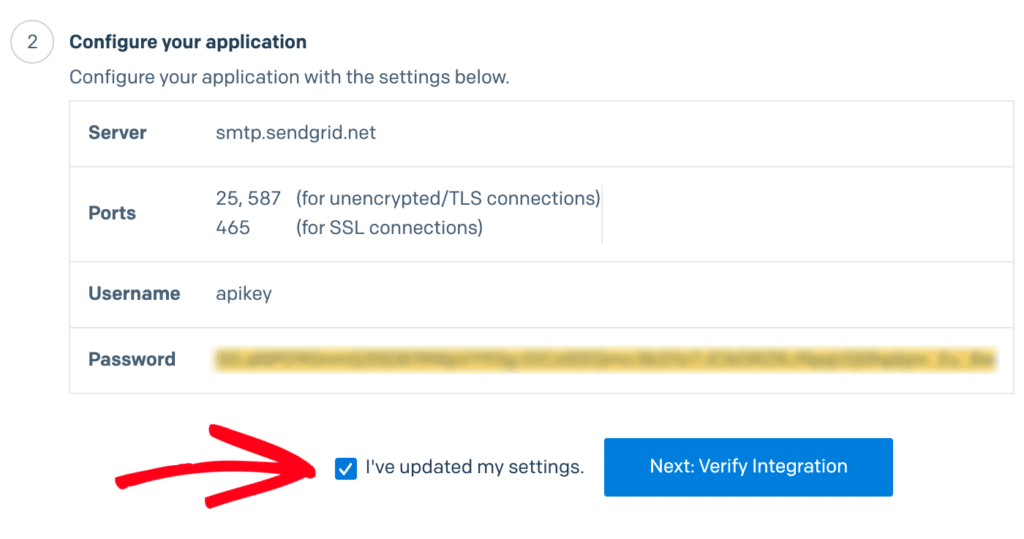
Verifying Integration in SendGrid
After your test email has been sent successfully, you’ll need to go back to your SendGrid account’s API page. Here, check the box labeled I’ve updated my settings and click Next: Verify Integration.
When the next page loads, click the Verify Integration button. This will send an email to SendGrid for verification.
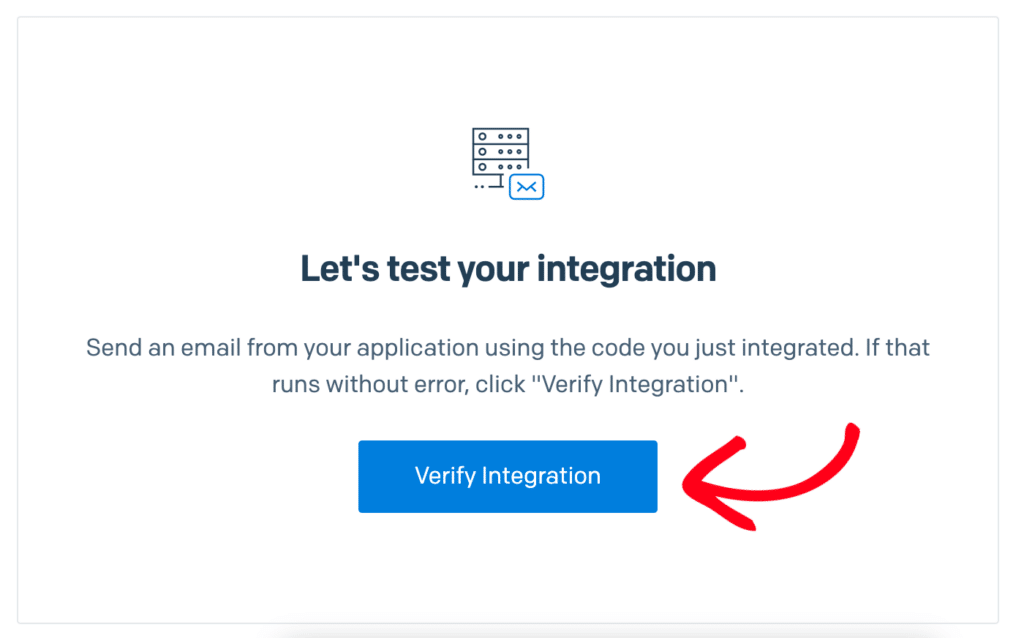
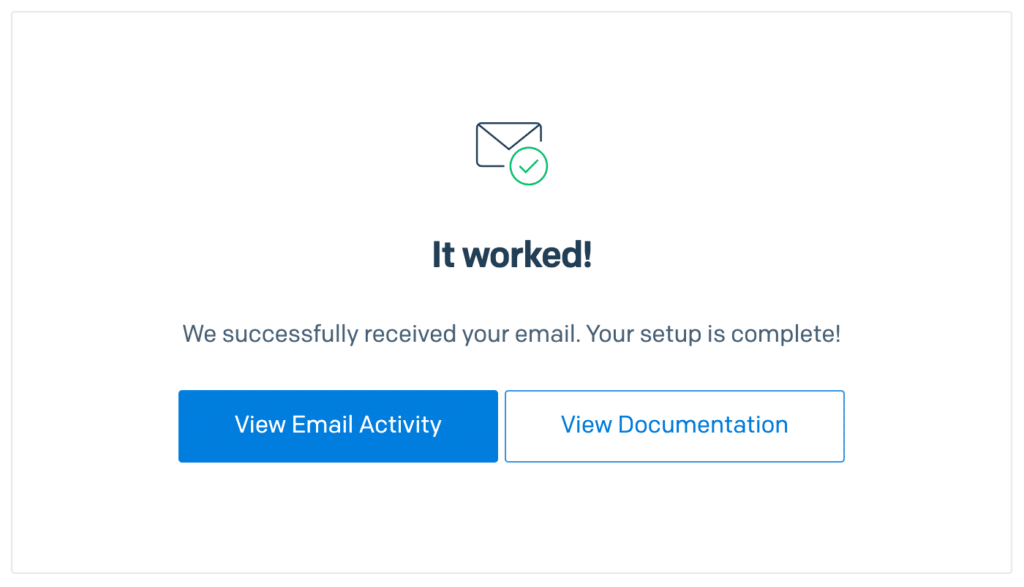
Once SendGrid has detected that your test email has already been sent, they’ll let you know with a success message. This may take a few moments to complete.
Frequently Asked Questions
These are the top questions we get from users regarding the SendGrid mailer.
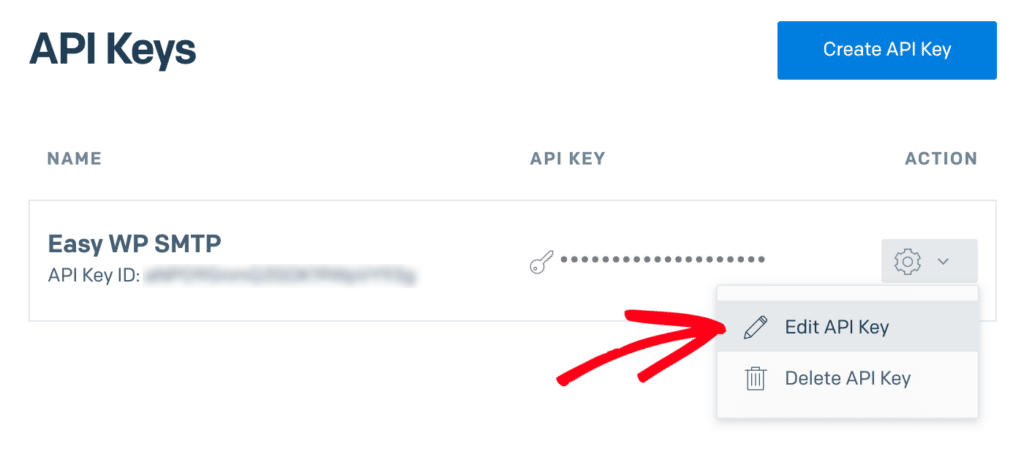
How can I check if my API key has the Mail Send access level in SendGrid?
To check that the API key you’ve created has the correct access level configured, first navigate to Settings » API Keys within your SendGrid account. This will bring you to a page with all of your available API keys. Click the gear icon and select Edit API Key to open up a specific key’s settings.
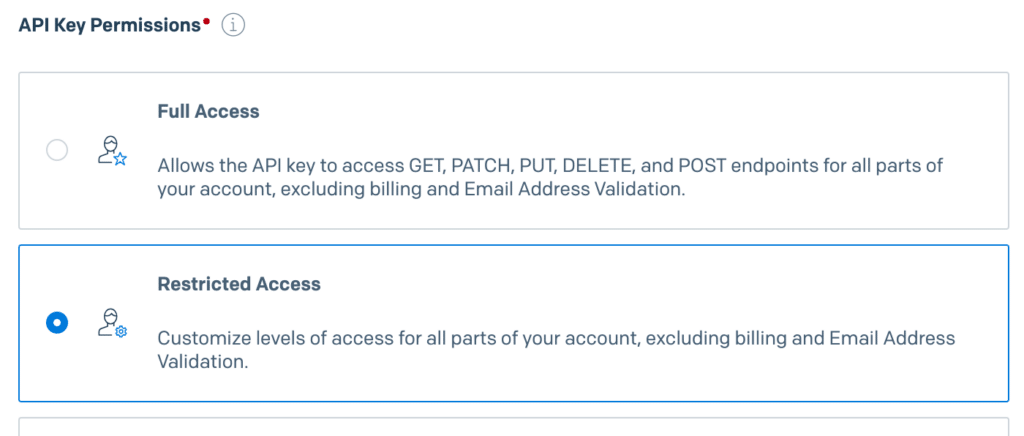
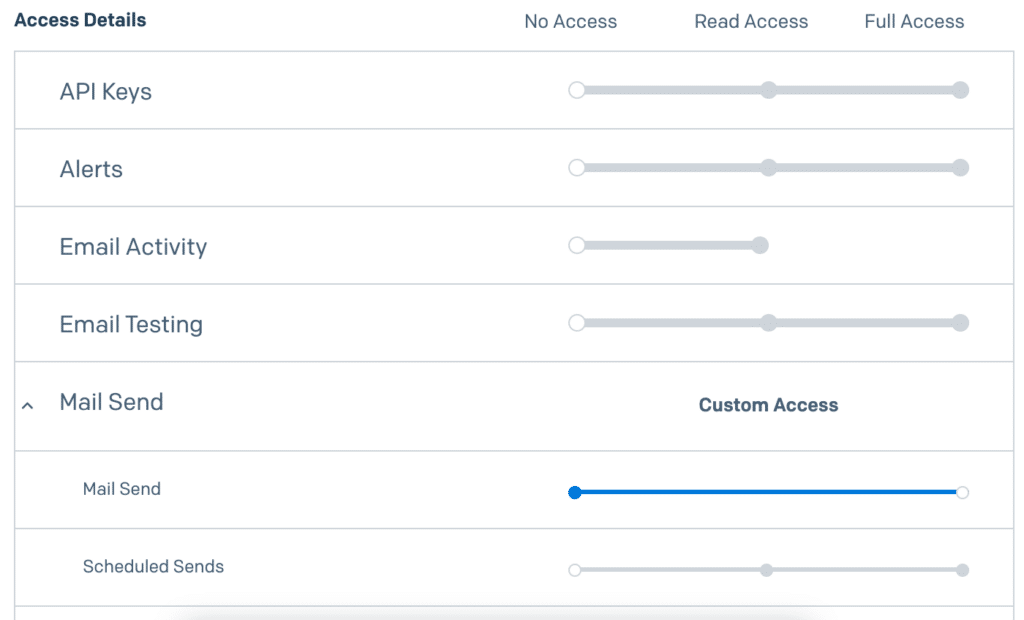
Once this option is selected, additional permissions will appear for you to configure. Scroll down to the Mail Send setting and be sure the permission level is set to Full Access.
That’s it! Now you can fix your WordPress site’s email delivery issues with SendGrid using Easy WP SMTP.