If you’re planning to sell ebooks, online courses, software, or any other downloadable product, WordPress gives you plenty of options to make it happen.
You just need a solid way to deliver files instantly, process payments securely, and keep everything running smoothly without spending hours on technical issues.
The good news is that, thanks to the payment features supported by WPForms, you don’t need a complicated eCommerce setup to start selling downloads.
So, without further ado, let’s dive into the steps to sell digital products on WordPress with the help of WPForms and make your first sale.
How to Sell Downloads on WordPress
Selling a digital product in WordPress may sound difficult, but with WPForms, it’s incredibly easy and fast. The Stripe Pro Addon does all the work for you. Follow the steps below to get started:
Step 1: Install and Activate WPForms
WPForms is one of the easiest ways to set up forms on a WordPress site. It works with Stripe and other payment processors, which is why I recommend it for selling digital products.
The free version of WPForms makes it possible to accept Stripe payments, though there’s a small 3% transaction fee on top of Stripe’s standard charges. If you’re just getting started, this is an easy way to begin selling without any upfront costs.
However, if you’re planning to sell regularly, upgrading to WPForms Pro makes more sense. It removes the extra transaction fee and unlocks advanced features that help automate sales.
Once you’ve picked the version that works for you, the next step is to download WPForms and activate it on your WordPress site.
Step 2: Get the Stripe Pro Addon
If you’re using a Pro license or higher, I highly recommend using the Stripe Pro addon if you want full access to advanced payment features.
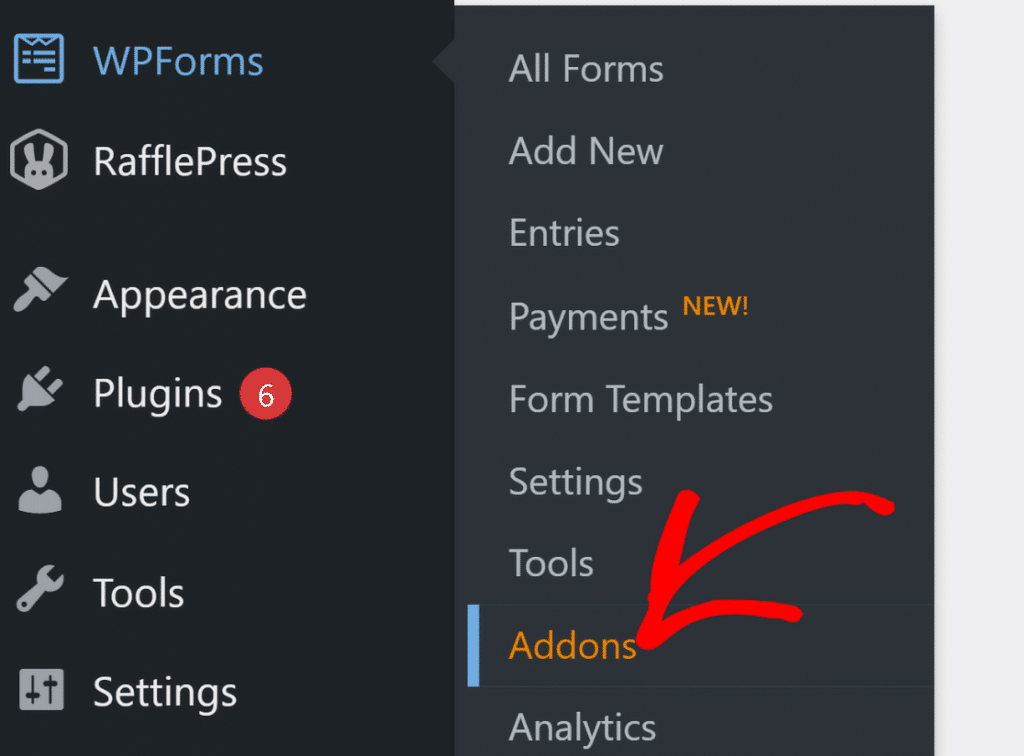
It makes the whole process of collecting payments through WPForms much smoother. To install it, go to your WordPress dashboard and navigate to WPForms » Addons.
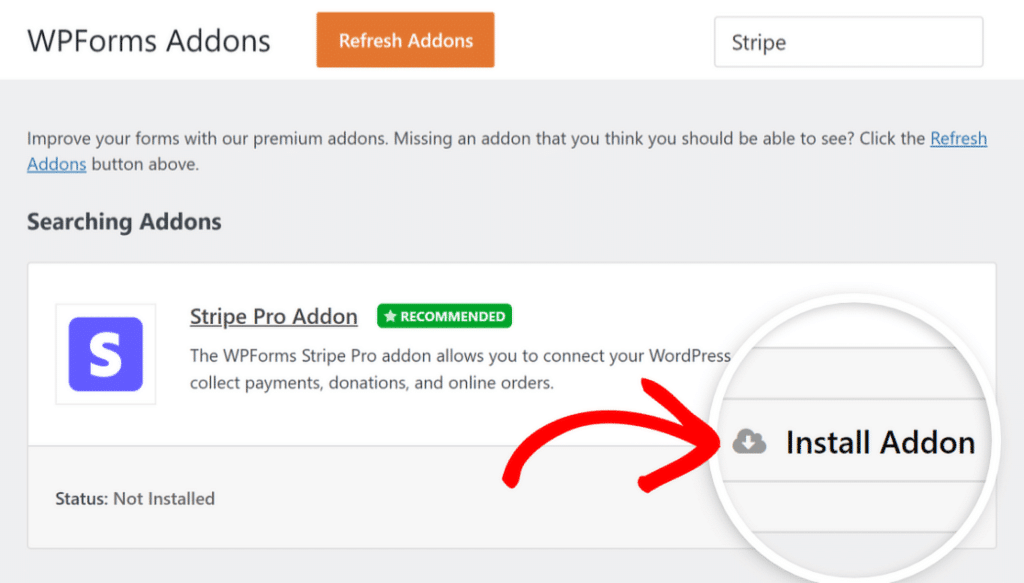
Once you’re on the Addons page, scroll through the list or use the search bar to find Stripe Pro Addon. Click the Install Addon button to activate it.
After installing the addon, the next step is connecting your Stripe account. This only needs to be done once, and it’s a simple process within the main WPForms settings.
Step 3: Connect WPForms with Stripe
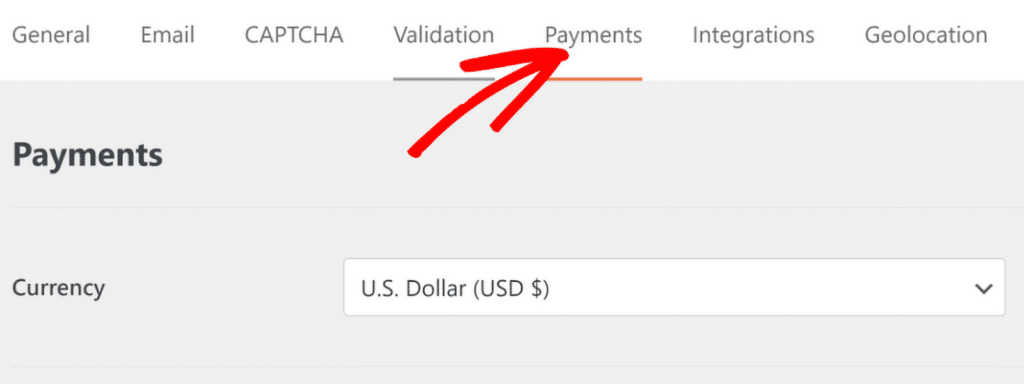
First, go to your WordPress dashboard, hover over WPForms, and select Settings. When the settings page loads, click on the Payments tab.
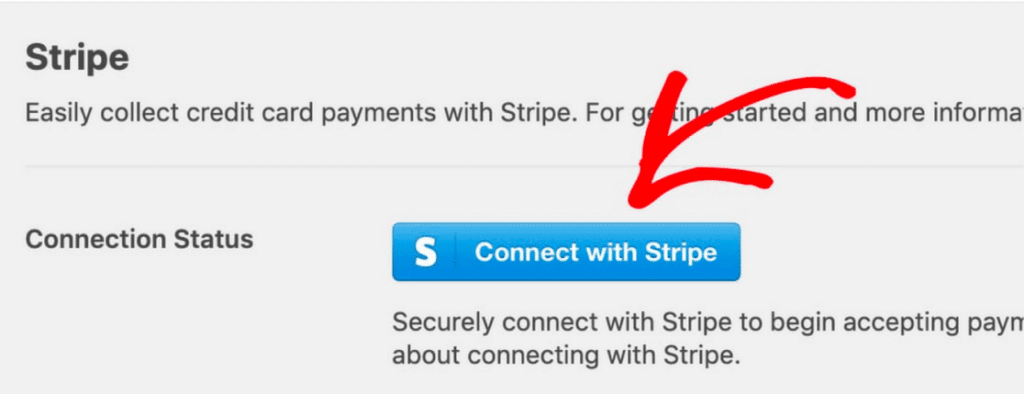
Scroll down until you see the Stripe section. Click Connect With Stripe, and you’ll be redirected to the Stripe login page.
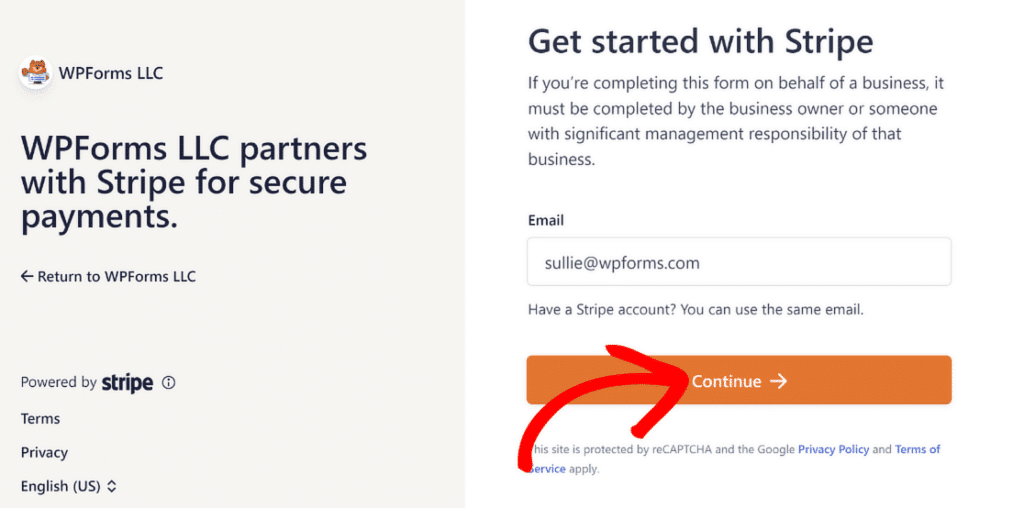
If you already have a Stripe account, just enter your credentials to connect it. If not, you can create a new account right from this screen.
Once the connection is established, go back to the WPForms Payments screen.
At this point, you should see a green confirmation message indicating that Stripe is successfully connected.

If you’d like to test your setup before accepting real payments, you can enable Test Mode by checking the box in the Stripe settings.
This lets you run test transactions without charging actual customers, ensuring everything works before going live.
Step 4: Create Your Digital Download Form
Now it’s time to set up a form. For this example, we’ll share the steps to let customers buy and download ebooks without needing a full checkout page.
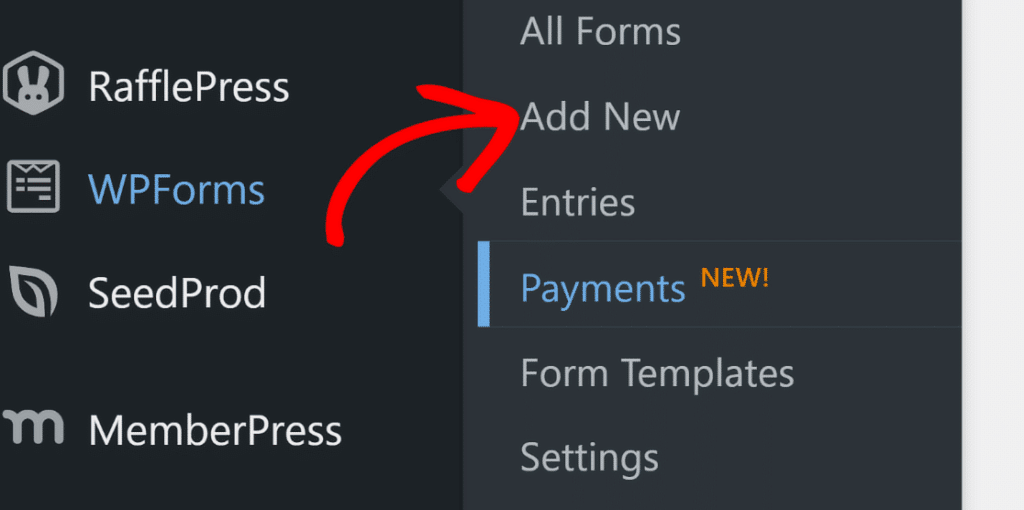
This is a simple way to start selling digital products without the hassle of setting up an entire online store. To begin, go to WPForms » Add New.
Once the form builder opens, type a name for your new form at the top. Then, scroll down to the Select a Template section.
I recommend selecting the Content Download Form Template from WPForms. Click Use Template to load it into the builder.
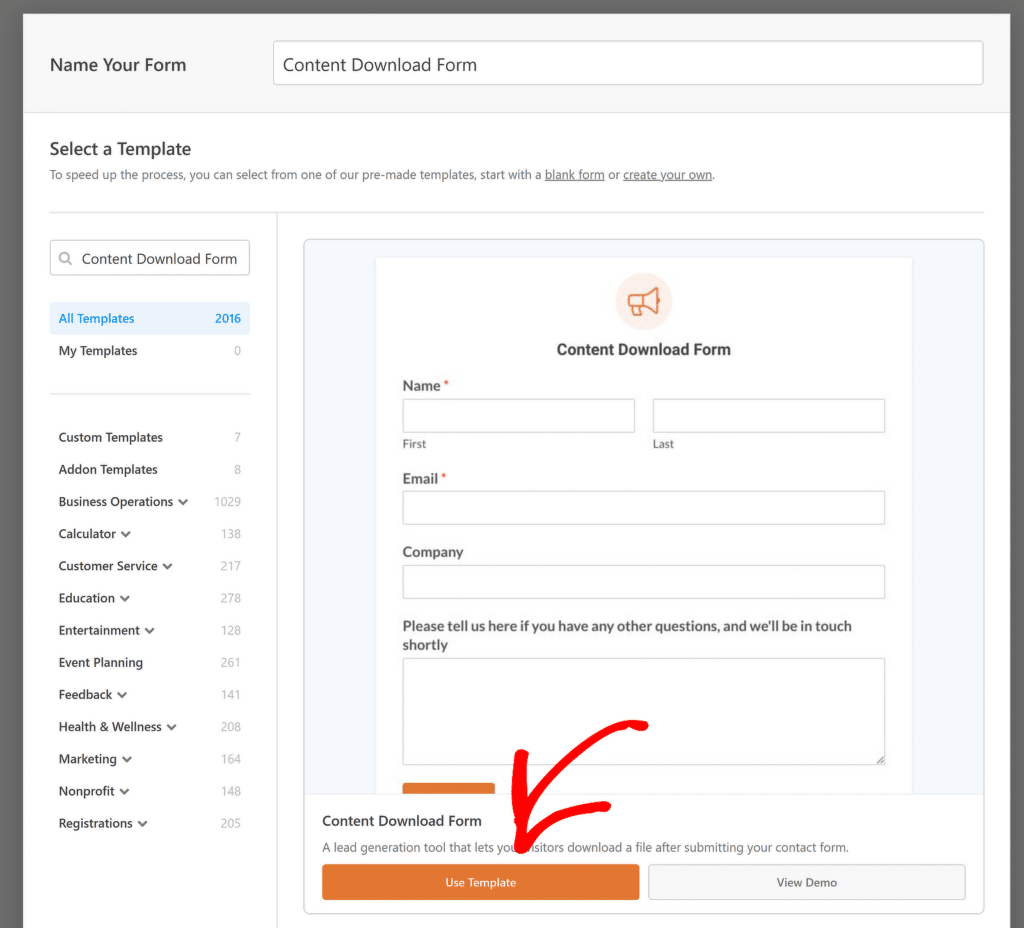
This template includes four basic fields: Name, Business Email, Company, and a text area for questions or comments. These appear on the right side of the builder.
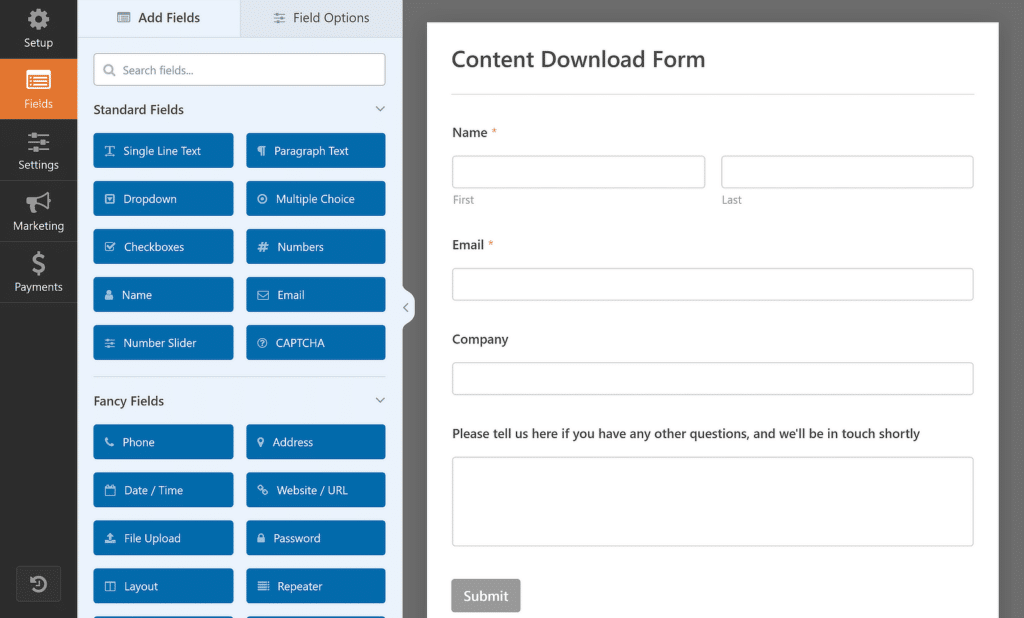
Insert a Dropdown Items Field
Since we need to add the ebooks for sale, we’ll insert a Dropdown Items field. This allows customers to select their preferred download.
Scroll down to the Payment Fields section and drag a Dropdown Items field into the form. Then, click on it to open the settings.
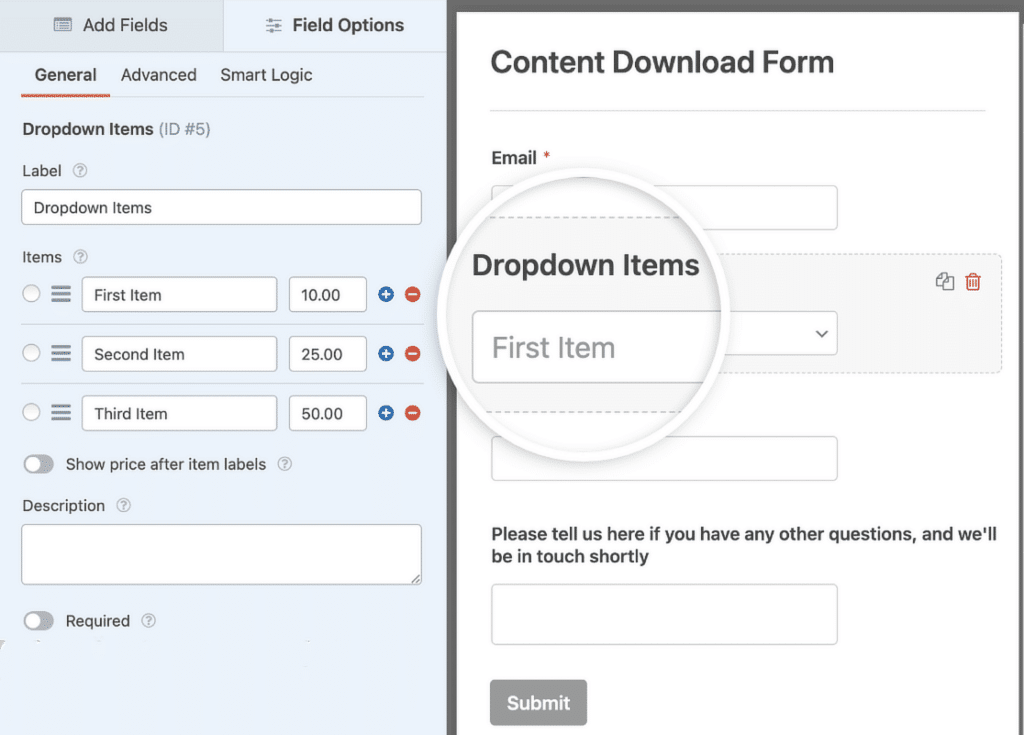
First, change the field Label to “Choose Your Ebook”. Next, update the dropdown options to list the ebooks available for purchase.
You can enter the title and price for each item. Use the plus (+) and minus (-) icons to add or remove options.
For better visibility, enable the Show price after item labels option. This ensures customers can see the price before making a selection.
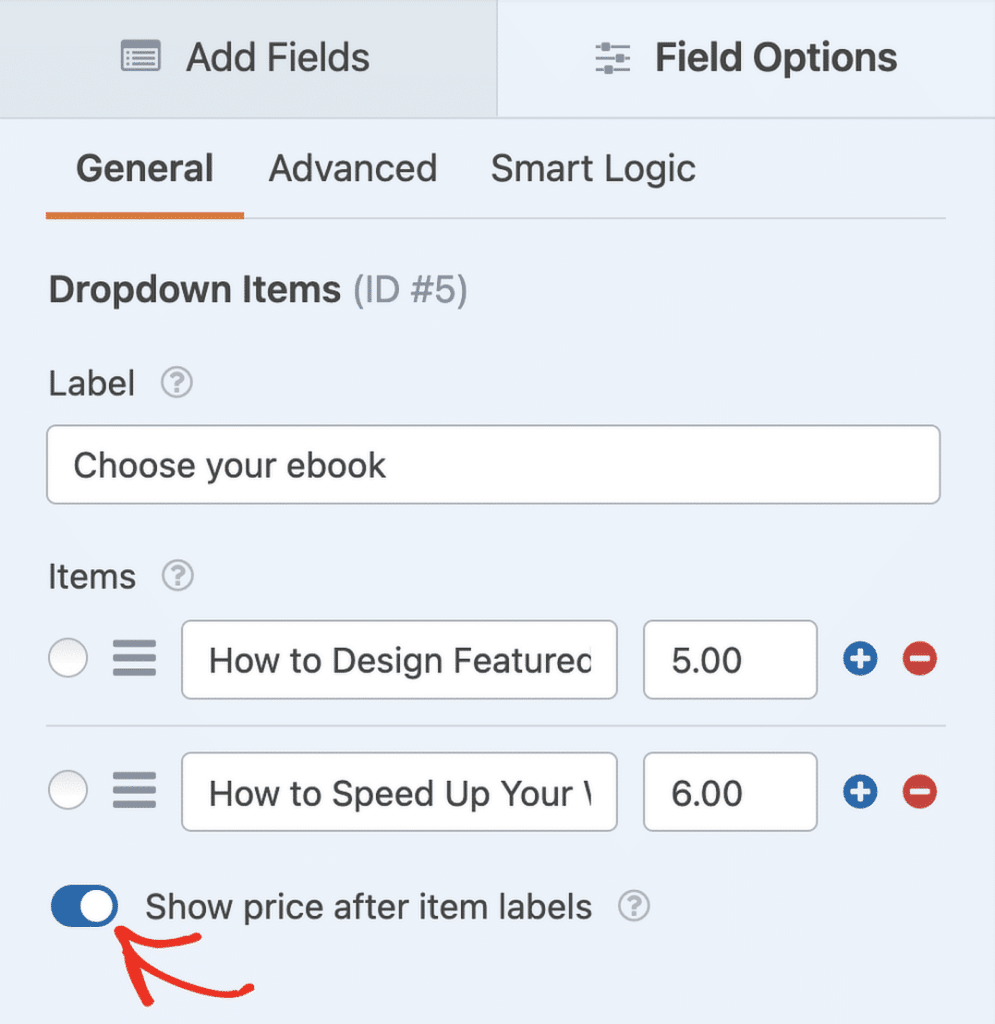
Since buyers can only purchase one item per transaction, a Total field isn’t necessary for this form.
Add the Stripe Credit Card Field
The last field needed to complete the form is the Stripe Credit Card field. Drag it onto the form to allow customers to enter their payment details at checkout.
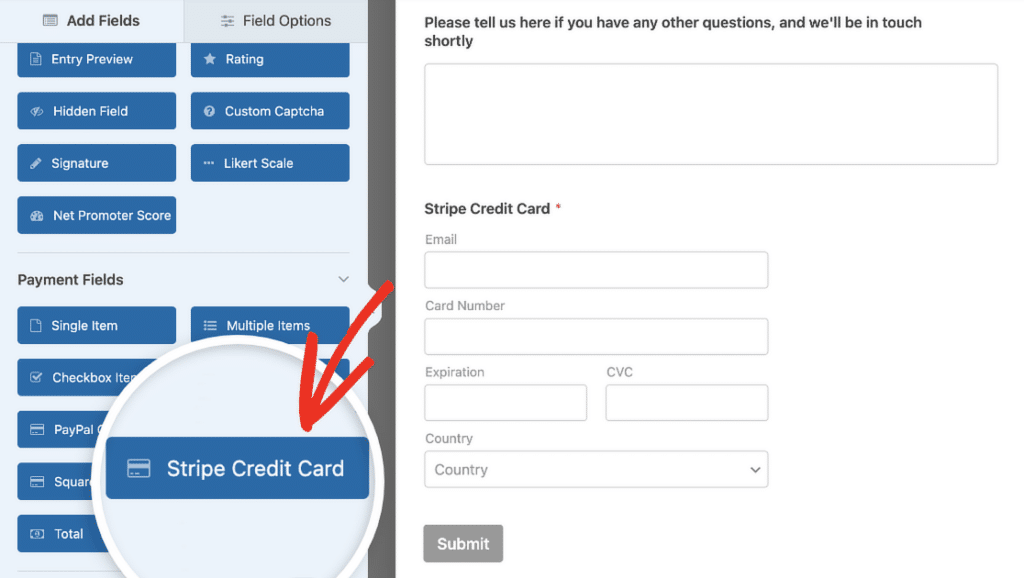
This field is already set up to work right away, but if you’d like to customize the Label or add a short description, just click on it to open the Field Options panel.
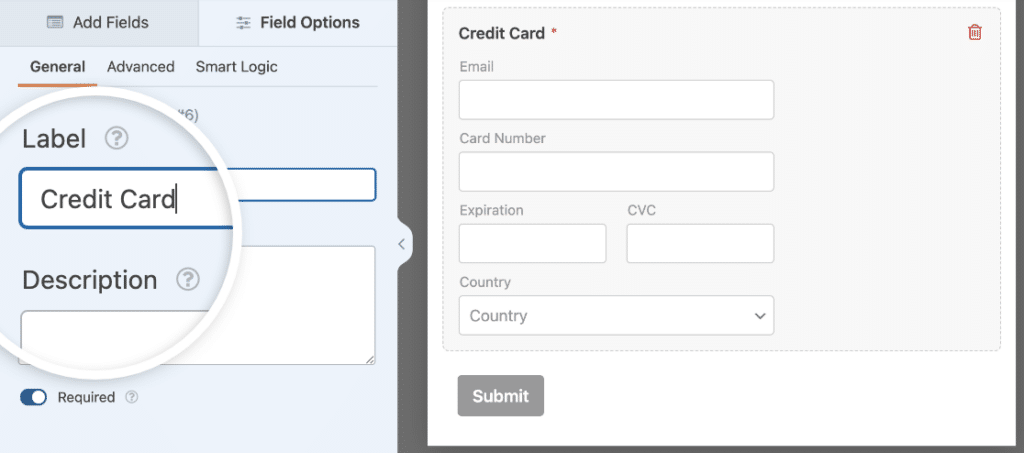
You’ll also notice an Email subfield in the Stripe Credit Card field. This lets customers use Stripe’s one-click checkout feature (Link) for faster payments in the future.
At this point, the form is fully set up to accept payments and allow downloads. However, Stripe won’t process transactions unless payments are enabled, which is the next step.
If you want to offer discounts, you can also add a Coupon field to let customers enter promo codes.
For details on how to do this, check out the guide on adding coupon fields to Stripe forms.
To activate Stripe and allow it to process transactions, go to Payments » Stripe, then use the toggle switch to Enable one-time payments.
Once enabled, additional options will appear to add a payment description and choose where the receipt should be sent.
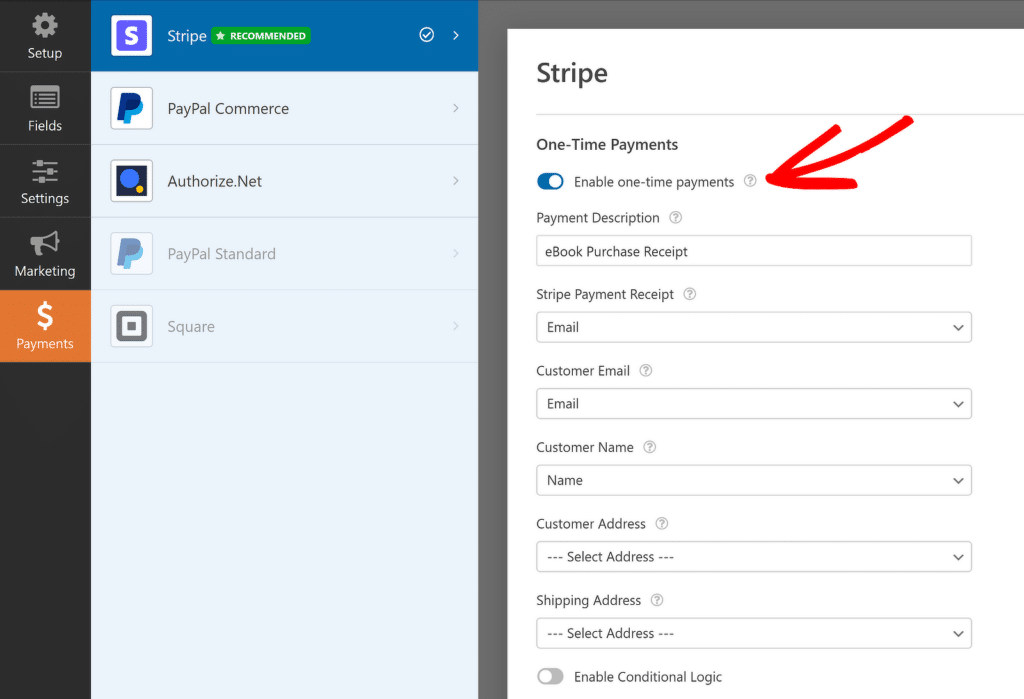
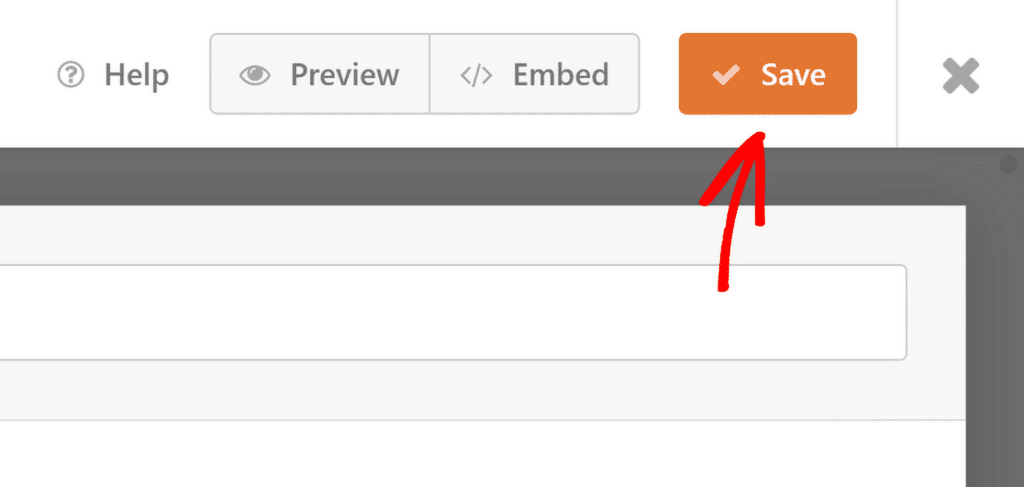
After filling in these details, click Save on the top right corner of the form builder to make sure your progress is safe.
Step 5: Add Download Links for Customers
Now that the form is ready to accept payments, the next step is ensuring customers receive their purchased download instantly.
One of the best ways to do this is by automating an email that sends the download link as soon as a customer submits the form.
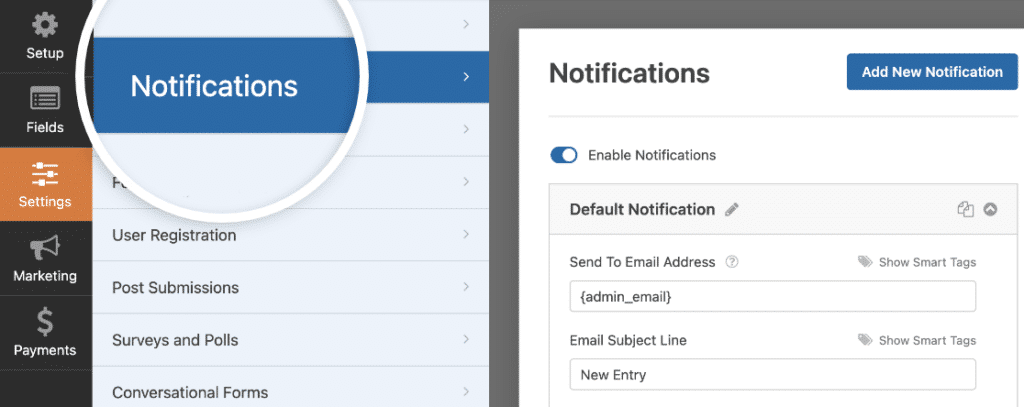
To set this up, go to Settings » Notifications in WPForms.
Setting Up the Download Email
WPForms automatically generates a notification that alerts you when someone submits a form. Since we want to send an email to the customer, we need to create a separate notification.
Click on Add New Notification, then name it something relevant to the file you’re selling. This makes it easier to manage if you have multiple products in the future.
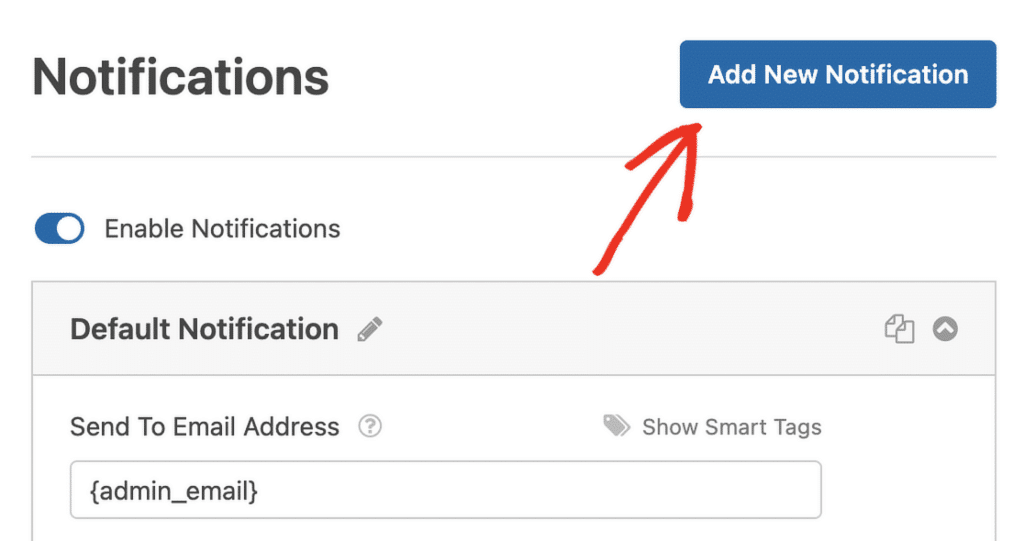
By default, WPForms sends emails to the admin email address. Since this notification needs to go to the customer, remove {admin_email} from the Send To Email Address field. Then, click on Show Smart Tags and select Email from the list.
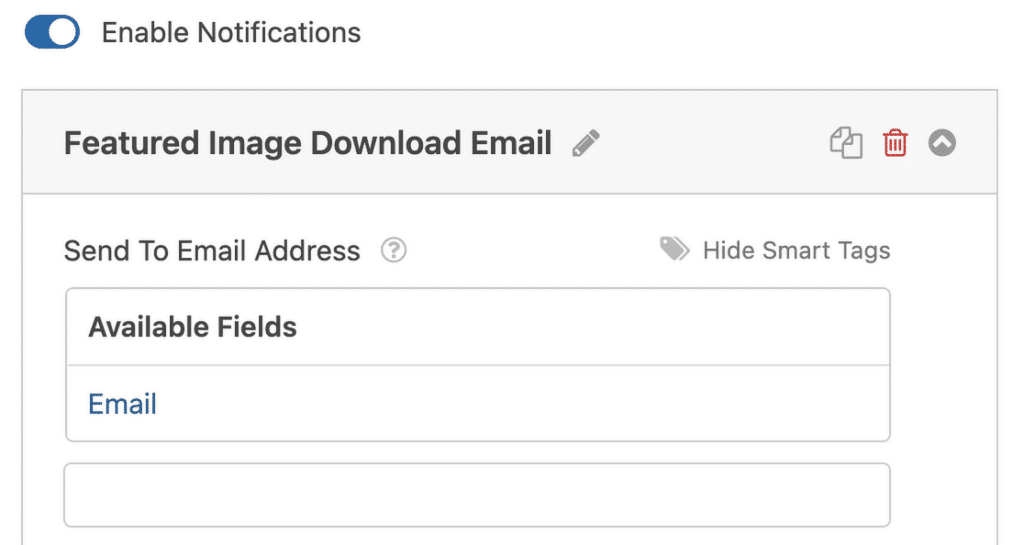
This ensures that the download email is sent to the email address the customer provided when filling out the form.
Adding the Download Link
Next, scroll down to the Email Message section, where you can write a short message confirming the purchase.
Delete the {all_fields} Smart Tag and replace it with a direct download link to the purchased file.
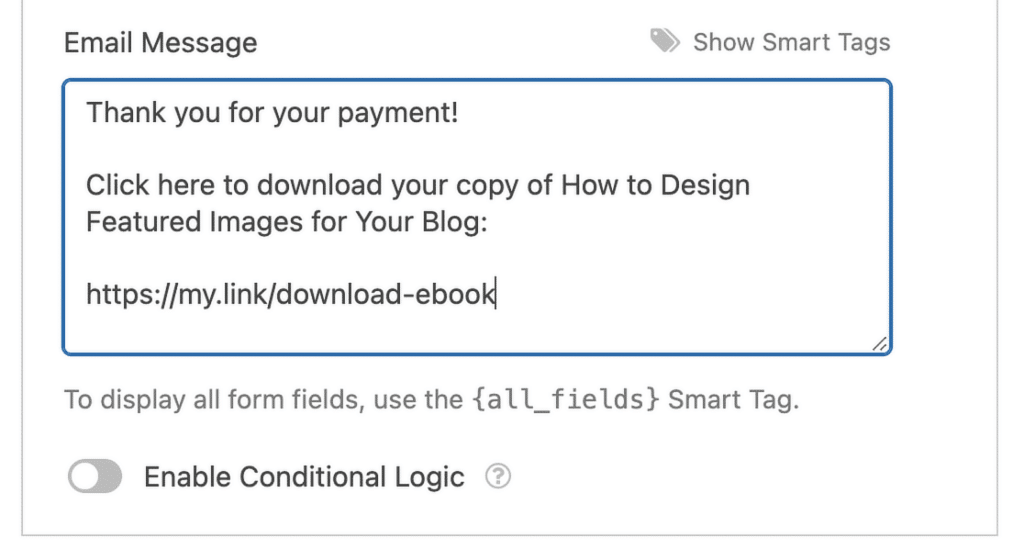
If you’re offering multiple products, you can Enable Conditional Logic to send different download links based on the item purchased.

Once everything is set up, your customers will automatically receive their download link after completing the purchase, making the entire process fast and hassle-free.
WordPress uses PHP mail to send emails by default, but this method can often lead to emails being flagged as spam or not being delivered at all.
That’s where Easy WP SMTP comes in. It uses proper SMTP servers to send email notifications from WPForms securely and quickly.
Honestly, it’s much better than relying on WordPress’s default email function since you get access to a ton of useful features.
For instance, you can see if your emails were delivered, opened, and even clicked. This insight is incredibly helpful for tracking your emails.
Step 6: Publish Your Digital Download Form
After setting up the order form for your digital product, the next step is to add it to your WordPress site so customers can start making purchases.
WPForms makes it easy to embed forms anywhere, whether in blog posts, pages, or sidebar widgets. While shortcodes work, I find the Embed wizard much simpler.
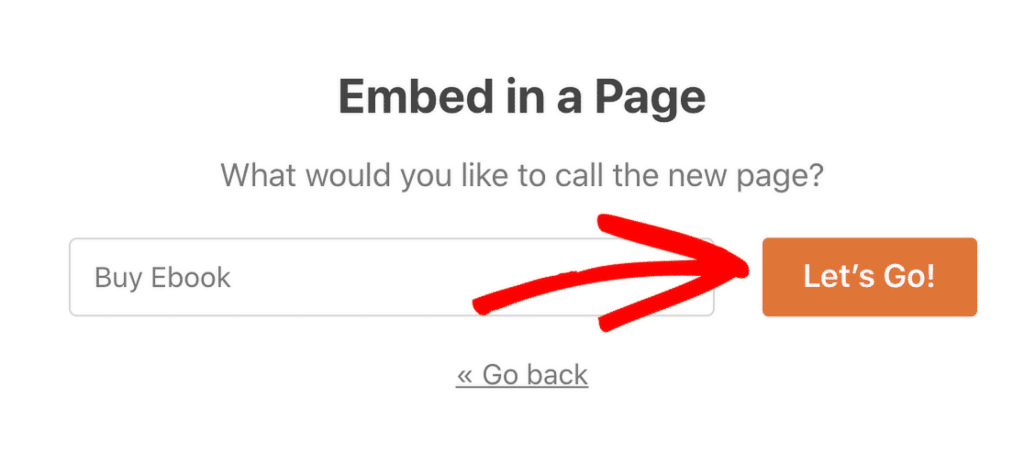
At the top of the form builder, click Embed to get started. A popup will appear with the option to Create New Page.
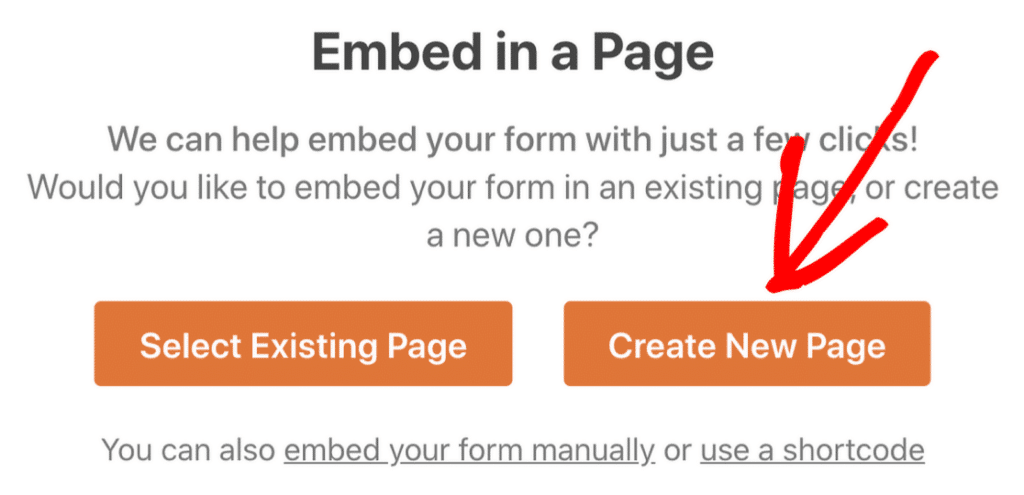
Click on it and type in a name for the page where your form will be placed. Once satisfied, click Let’s Go to proceed.
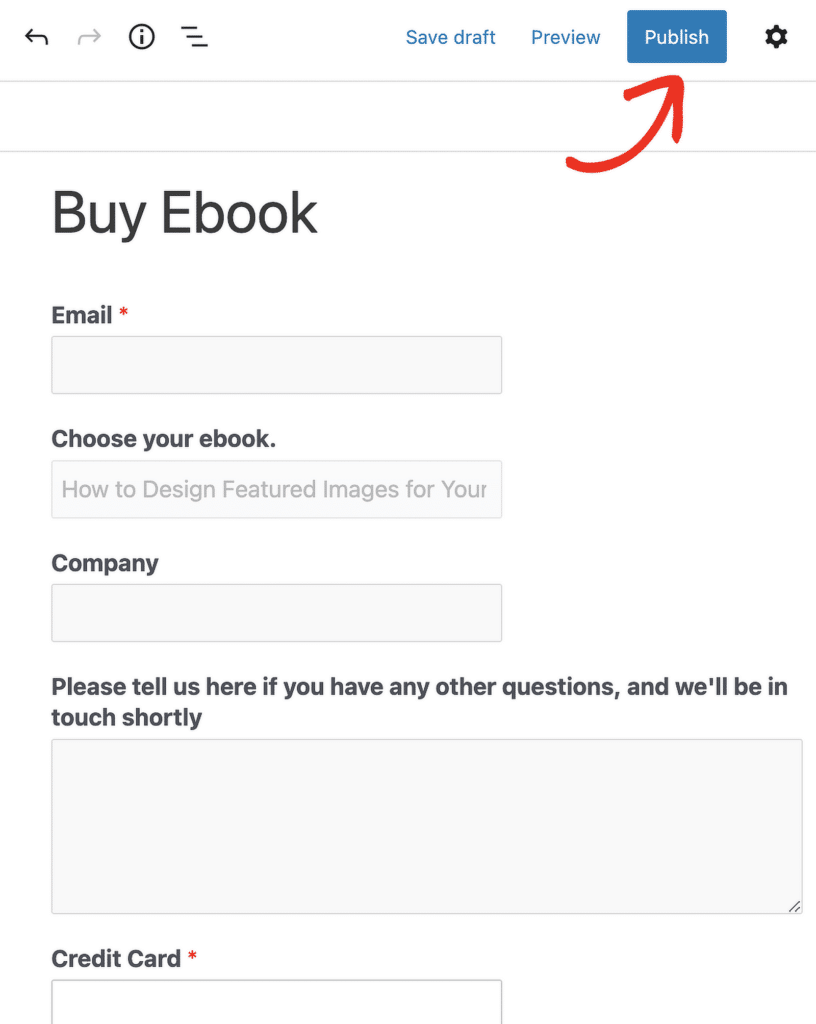
Here, you can review how everything looks, add any extra content, and set up SEO settings for the page if needed. When the page is ready to publish, click Publish at the top.
Before promoting your product, it’s always a good idea to make a test purchase to ensure everything works smoothly.
If you used test mode during setup, don’t forget to switch to live mode before launching.
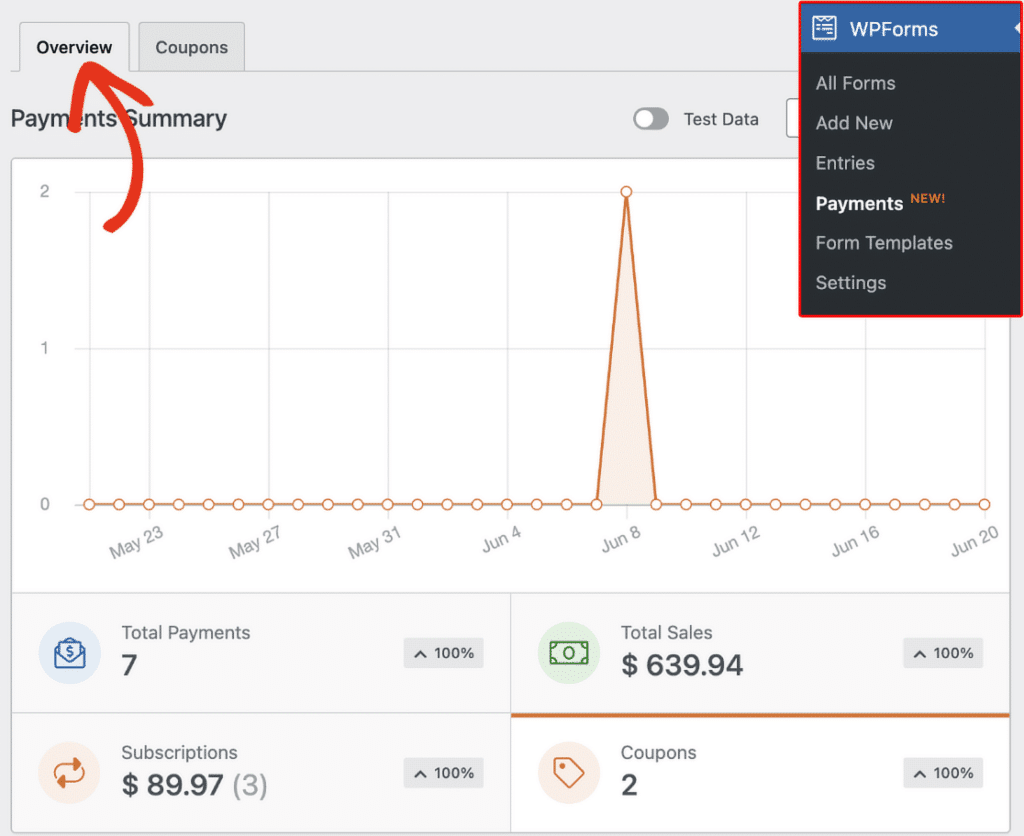
Once your form is live and orders start coming in, you can track your sales and payments by going to WPForms » Payments.
That’s it! With just a few steps, you can start selling digital downloads on your WordPress site and accept payments instantly.
FAQs on Selling WordPress Downloads
Selling digital products is a popular topic of interest among our readers. Here are answers to some common queries about it:
Does WordPress allow you to sell products?
Yes, WordPress lets you sell products through plugins like WPForms, Easy Digital Downloads, and WooCommerce. You can sell physical or downloadable products with secure payment options.
Can I sell ebooks on WordPress?
Absolutely! You can create a simple checkout page using WPForms or Easy Digital Downloads. Once a customer buys the ebook, you can set up automatic email delivery with the download link.
Are there specific legal considerations when selling digital products online?
Yes, you need to follow copyright laws, create clear refund policies, and comply with data privacy regulations like GDPR or CCPA. Adding terms and conditions to your checkout process is a good practice.
Is it profitable to sell digital products?
Yes, selling digital products can be highly profitable since there are no inventory costs. If you have valuable content and a strong marketing strategy, you can generate consistent sales.
How can I automate the delivery of digital products after purchase?
You can set up automatic emails in WPForms or Easy Digital Downloads to send customers their download links as soon as they complete their purchase. This makes the process hands-free and efficient.
That’s it! Now you know how to sell digital products on WordPress.
Next, offering a lead magnet to your visitors is probably one of the most effective ways to grow your email list and capture high-quality leads.
Check out this guide to learn how to create lead magnet pages and a signup form that allows you to capture email addresses effectively.
