If you’ve ever opened your inbox and found a flood of spam messages from your website’s contact form, you know how frustrating it can be.
Dealing with bots and unwanted messages takes time away from focusing on real leads and even puts your website’s security at risk.
Fake inquiries, automated bot messages, or irrelevant promotions, prevent you from getting in touch with visitors genuinely interested in what you offer.
So, in this guide, I’ll walk you through the best methods I’ve used to stop spam while making sure your contact form remains easy to use for potential customers.
- How to Manage Form Spam Protection and Security
- 1. Enable WPForms’ Anti-Spam Protection
- 2. Turn on Akismet Anti-Spam Protection
- 3. Use reCAPTCHA, hCaptcha, or Cloudflare Turnstile
- 4. Use the WPForms Custom CAPTCHA Field
- 5. Add a Minimum Time Requirement
- 6. Control Who Can Submit Forms
- 7. Restrict Form Submissions by Country
- 8. Block Unwanted Words with Keyword Filtering
- 9. Make Users Verify Their Email
- 10. Blacklist IP Addresses to Block Spam
How to Manage Form Spam Protection and Security
With the different spam filters available in WPForms, I can stop unwanted entries from being submitted and keep my site safe from phishing, malware, and other bot attacks as part of my regular website maintenance. Here’s how I do it:
Accessing Spam Protection and Security Settings
Before getting started, I make sure WPForms is installed and activated, and that my license is verified on my WordPress site.
If you’re not sure how to install WPForms, WPBeginner has a useful guide on installing WordPress plugins.
Once the plugin is set up, I either create a new form or edit an existing one to open the form builder. From there, I go to Settings » Spam Protection and Security.

This page contains all the essential options for blocking spam in form entries. I’ll walk you through each of them below:
Important Reminder:
Stopping spam is just one part of the equation. Making sure emails actually reach people is just as important. If notifications from contact forms aren’t delivered, users won’t get the messages they need.
That’s why I always recommend using a WordPress SMTP plugin like Easy WP SMTP. It improves email deliverability and prevents messages sent from your WordPress site from landing in spam folders.
1. Enable WPForms’ Anti-Spam Protection
This spam protection setting is built right into the form builder. To find it, go to Settings and click on Spam Protection and Security.
The Enable anti-spam protection option is usually turned on by default, but I always double-check and adjust it if needed.

With this setting active, if a bot tries to get past the spam filters, the form simply won’t go through and will block them instantly.
It uses a Honeypot technique and a multi-layer solution to enhance spam detection and prevention.
Note: JavaScript has to be enabled on your website in order for modern anti-spam protection to work correctly.
2. Turn on Akismet Anti-Spam Protection
To use this spam protection feature in WPForms, you’ll need the Akismet Spam Protection plugin.
Some WordPress setups come with it preinstalled, but if you don’t see it on your site, make sure to install and activate it first.

Once the plugin is set up, I reecommend that you follow the steps in the WPForms documentation to connect Akismet to your WordPress site.
After setting up Akismet, I protect my forms by enabling spam filtering with it by simply turning on the Enable Akismet anti-spam protection option.

Akismet checks form submissions and filters out messages that are marked as spam.
Over time, it learns to recognize and block similar spam messages based on reports from other users.
If I want to keep a record of spam entries, I turn on the Store spam entries in the database option.

When this option is active, any entries flagged as spam are saved under the Spam section in the form’s Entries page.

There’s a full guide on how to view and manage spam entries, which helps if I ever need to check through them.
3. Use reCAPTCHA, hCaptcha, or Cloudflare Turnstile
One of the best ways to cut down on spam is by adding a CAPTCHA to your contact form. This ensures that only real users can submit forms while blocking bots.
WPForms supports reCAPTCHA, hCaptcha, and Cloudflare Turnstile, each offering different ways to verify users.
These tools require people to complete simple tasks, like clicking a checkbox or selecting images, which bots struggle to get past.
Here’s what I’ve learned about each option and when to use them:
reCAPTCHA
reCAPTCHA, created by Google, is one of the most popular CAPTCHA options out there. It works by asking users to check a box or solve a quick puzzle, depending on how likely they are to be a bot.
There are three types of reCAPTCHA:
- Checkbox reCAPTCHA v2 – Requires a user to click a checkbox to confirm they’re human.
- Invisible reCAPTCHA – Works in the background without requiring any action from users.
- reCAPTCHA v3 – Automatically scores form submissions and blocks suspicious ones without any user interaction.
I recommend reCAPTCHA if you want something easy to set up that works well with other Google services. It’s widely used and gets the job done without adding too much friction for real users.
Setup Guide: How to Set Up reCAPTCHA in WPForms
hCaptcha
hCaptcha works just like reCAPTCHA but focuses more on privacy. Unlike Google’s solution, it doesn’t track users or collect extra data.
The biggest reason I would recommend choosing hCaptcha over reCAPTCHA is to avoid Google services or if your website has a privacy-first approach.
If you’re looking for an alternative to reCAPTCHA that respects user privacy or needs to follow GDPR practices, hCaptcha is the best option.
Setup Guide: Integrating hCaptcha with WPForms
Cloudflare Turnstile
Cloudflare Turnstile is a newer option that removes most of the usual CAPTCHA challenges.
Instead of asking users to click checkboxes or solve puzzles, it works in the background by analyzing session and behavior data to verify if someone is a real person.
The main reason I would use Cloudflare Turnstile is if I want spam protection without making users complete any extra steps. It’s a great choice for improving security while keeping the experience smooth.
Setup Guide: Setting Up Cloudflare Turnstile in WPForms
4. Use the WPForms Custom CAPTCHA Field
If you’ve already set up a CAPTCHA in WPForms but spam submissions are still slipping through, I recommend that you take a different approach.
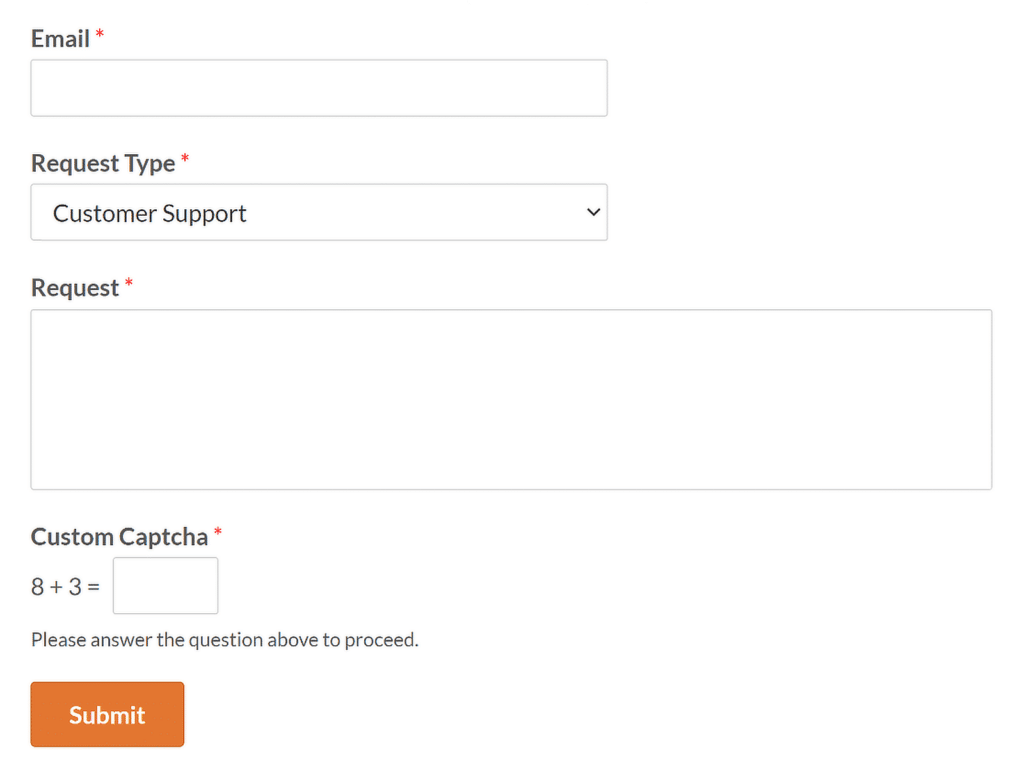
This is where the WPForms Custom CAPTCHA field comes in. It lets you create your own challenge, like logic-based questions or simple math problems, that bots can’t solve.
You can find the Custom CAPTCHA field under Fancy Fields in the form builder. This means you’ll require a WPForms Basic License or above to access this feature.

To set it up, click on the field in the form preview panel, which opens the Field Options. From here, you can change the Label, Type, and Description to fit what you need.
If you want a Math-based CAPTCHA, select Math from the Type dropdown. (Alternatively, you could use a Question and Answer captcha.)

Once your form is live, this field automatically changes the Math equation every time the page reloads.
If you want to modify this CAPTCHA with custom code, see this guide on customizing the Math Captcha for more information.
5. Add a Minimum Time Requirement
WPForms has a feature that lets me set a minimum time before someone can submit a form. Adding this delay helps filter out unwanted submissions.
This is really useful for blocking spam because bots tend to fill out forms instantly, while real users take time to read and type.
To turn this on, go to Settings » Spam Protection and Security. Then, toggle ON the Enable minimum time to submit option.

Once it’s enabled, enter a number in the field that appears. This number represents how many seconds a user needs to spend on the form before submitting it.

If someone tries to submit the form before the time is up, they’ll get an error message telling them to wait a little longer before trying again.

This simple setting has helped me block automated spam, making sure only real people have the chance to submit forms on my site.
6. Control Who Can Submit Forms
If I want to reduce spam and get better quality leads, WPForms gives me the option to allow or block specific email addresses from submitting forms.
This is really useful when I want to filter out junk submissions or limit form access to a certain group of people.
Allow Only Certain Emails (Allowlist)
The Allowlist makes sure that only approved email addresses can submit the form. This is perfect when I need to limit access to my team or organization.
For example, I can allow only emails from my company’s domain, like @mybusiness.com, to submit the form.
Block Certain Emails (Denylist)
The Denylist lets me block unwanted email addresses or domains.
If I’m running a form for business leads, I might want to block free email providers like @yahoo.com, @gmail.com, and @hotmail.com so I only get submissions from company emails.
How to Set It Up
To create an allowlist or denylist, open your form in the builder, click on the Email field, go to the Advanced tab, and scroll down to the Allowlist / Denylist option.

Once you select Allowlist or Denylist, a box appears where you can enter full email addresses or use an asterisk (*) for partial matches.

You may use this setting to generate partial matches in a variety of formats based on your company’s requirements. For example:
- [email protected] – Blocks one specific email address
- [email protected]* – Blocks all email addresses that start with “blocked”
- @example.org – Blocks all email addresses from example.org [email protected] – Blocks all emails starting with “s” from example.net
- *[email protected], [email protected], @business.co.uk – Blocks the first two exact emails and all emails from business.co.uk
There’s no limit to how many emails or patterns you can add, and you can place the asterisk anywhere in the email string to block entire groups of emails.
This feature has helped me keep my form submissions clean and ensures that I’m only getting responses from the right people.
7. Restrict Form Submissions by Country
One of the easiest ways I’ve found to limit spam and unwanted submissions is by setting a country-based filter. This lets you decide which countries can or can’t submit a form on your site.
To turn this on, open your form in the form builder, go to Settings » Security and Spam Protection, and switch on the Enable country filter option.

Once it’s on, a dropdown menu appears where you can choose whether to Allow or Deny form submissions based on location.

If you want to accept form submissions only from a specific country, select Allow and pick the country from the list.
For example, if I only want users from the United States of America, I choose it from the dropdown.

Now, anyone outside the selected country trying to submit the form will see a message saying: “Sorry, this form does not accept submissions from your country.”

This filter applies only to the form where it’s enabled, so you can still allow global submissions on other forms if needed.
For me, this has proved to be a great way to block spam and unwanted entries without affecting other parts of my site.
8. Block Unwanted Words with Keyword Filtering
WPForms has a keyword filtering option that helps you stop fake submissions from real users.
This is especially helpful when you want to block messages containing profanity or other unwanted words.
To set this up, open your form in the form builder, go to Settings » Spam Protection and Security, and turn on the Enable keyword filter option.

Once it’s activated, a text box appears where you can enter words or phrases that you want to block.
Each keyword needs to be on a separate line so that the filter can detect them properly.

Now, if someone tries to submit a form using any of the blocked words, their submission won’t go through.

Be careful when adding words to this filter, as it blocks any message containing the words you’ll list.
I always make sure to be very specific here so that I don’t accidentally block real submissions.
9. Make Users Verify Their Email
If you allow user registrations on my site, know that spammers and bots might try to sign up using fake email addresses.
One of the easiest ways to stop this is by requiring email verification before a new account is created, which a lot of spammers don’t have the patience for.
WPForms makes this process very simple. Once you’ve created your user registration form, go to Settings » User Registration.

Note: This feature uses the WPForms User Registration addon, which requires a Pro License or above.
To activate it, click the box next to Enable User Registration, and then map all of your form’s required fields.

After that, scroll down to the User Activation & Logins section. I recommend toggling on the Enable User Activation option.

Next, choose User Email as the activation type, customize the email subject, and message, and select a User Activation Confirmation Page.

Now, whenever someone tries to register, they must use a real email address to receive an activation link.
If they enter a fake email, they won’t be able to complete the signup process, making sure only real users can proceed ahead.
10. Blacklist IP Addresses to Block Spam
Blocking spam by banning specific IP addresses isn’t the most effective method since spammers can use proxies and VPNs.
However, if I notice the same IPs sending spam on my website over and over again, blocking them can still help.
To do this, go to Settings » Discussion in the WordPress dashboard. Then, enter the IP addresses you want to block inside the Disallowed Comment Keys box.

If you need to block multiple IPs, make sure to put each one on a new line so that WordPress can recognize them properly.
Pro Tip: To identify spam IPs, add the {user_ip} smart tag to your WPForms email notifications.
FAQs on How To Prevent Contact Form Spam in WordPress
Preventing contact form spam in WordPress is a popular topic of interest among our readers. Here are answers to some common queries about it:
How to secure a contact form on my WordPress site?
To secure your contact form in WordPress, consider using WPForms. This plugin offers built-in spam protection, including hidden anti-spam tokens and CAPTCHA options, to prevent unwanted submissions.
Can blocking specific IP addresses reduce contact form spam in WordPress?
Blocking specific IP addresses can help reduce contact form spam in WordPress. By identifying and restricting IPs associated with spam, you can prevent repeat offenders from accessing your forms.
How does enabling email verification prevent spam user registrations in WordPress?
Enabling email verification for new user registrations adds an extra layer of security. This process requires users to confirm their email addresses, deterring spammers using fake emails from completing registrations.
How do I stop contact form emails going to spam in WordPress?
To prevent contact form emails from going to spam in WordPress, it’s essential to configure proper email authentication.
Using a plugin like WP Mail SMTP ensures your emails are sent through a trusted SMTP server, improving deliverability and reducing the chances of emails being marked as spam.
That’s it! Now you know how to prevent contact form spam in WordPress
Next, are you trying to figure out how to send transactional emails with WordPress that actually make it to your users’ inboxes?
Check out this guide to learn everything you need to know about sending transactional emails from WordPress.